
Technical data


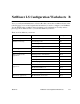


A-2 Configuring for Multiple Protocols 90362-01
To set up the local LAN to use multiple protocols:
Set the NetBlazer name, password, date, and time (select
NetBlazer
setup
). Then select
NetBlazer port setup
and select the first protocol
to configure. When you finish that protocol, select
Previous
to move
back to the NetBlazer Port Setup screen so you can set the next
protocol.
To set up a dedicated line to send and receive packets using multiple
protocols:
Fill in the fields on the Dedicated Interface screen. Then select
Protocol details
and make your choices for the first protocol. When
you are done, you can configure the next protocol (if you configured
IP, you may need to select
Previous
to return to the Protocol Details
screen). Remember that if you have more than one dedicated line,
each line can be set up differently.
To set up a dial-up line to send and receive packets using multiple
protocols:
Fill in the fields on the Dial-up Connection screen. Then select
Protocol details
and make your choices for the first protocol. When
you are done, you can configure the next protocol (if you configured
IP, you may need to select
Previous
to return to the Protocol Details
screen).
Be aware that for dial-in users each user (or account name) is restricted to
having only having one connection type; this means that Josephine Jones
can only be IP or IPX, but not both IP and IPX. To work around this, you
can create separate “users” for Josephine Jones, such as “Josephine-IP” and
“Josephine-IPX.”
Note:
If you select SLIP for your type of dedicated line, you can only set up IP
routing. If you want to have AppleTalk and IPX routing on your dedicated
line, you need to select
PPP
for
Framing type
on the Dedicated Interface
screen.
Note:
If you select SLIP for your type of dedicated line, you can only set up IP
routing. If you want to have AppleTalk and IPX routing on your dedicated
line, you need to select
PPP
for
Framing type
on the Dial-up Connection
screen.