
Installation Guide

2
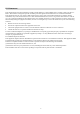
Operation
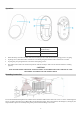
1. LED
4. Battery Cover (Wall
Mount Bracket)
2. Tamper button
3. Battery
When the battery is installed, the Blue LED will be blinking for 90 seconds which indicates paring process is on going.
If pairing succces, Blue LED will be solid on for 3 seconds.If paring fail, Red LED will be solid on for 3 seconds.
If paring fail, press paring button for 5 second to restart paring process.
The motion sensor needs to be checked and perform walk test annually to make sure the detection function is working
properly.
CAUTION:
RISK OF EXPLOSION IF BATTERY IS REPLACED BY AN INCORRECTED TYPE. DISPOSE OF USED
BATTERIES ACCORDING TO THE INSTRUCTIONS.
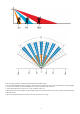
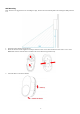
Mounting Instruction
The recommended mounted position for a Motion Sensor should be 1.8M from the floor in the corner of a room. At this height, the
device can detect a movement up to 10M (±1M ) (see the following image). Also, in this position, the 90 degrees (±10 degree) fan-
shaped detection pattern can normally offer greater protection than mounting on a flat wall.