
User Guide

12
13
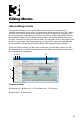
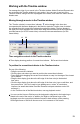
Working with the Timeline window
You arrange the clips of your movie in the Timeline window. Adobe Premiere Elements lets
you customize the Timeline window for your project. You can zoom in and out of the
Timeline window, change how the clips appear in the tracks, and resize the tracks and the
header area.
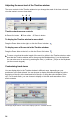
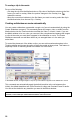
Moving through a movie in the Timeline window
The Timeline window’s current-time indicator , a blue triangle in the time ruler,
corresponds with the frame displayed in the Monitor window’s Timeline view. A vertical
line extends from this current-time indicator through all the tracks. The time display in
the upper left corner indicates the current time using the timecode format hours;minutes;
seconds;frames (for NTSC format video) or hours:minutes:seconds:frames (for PAL
format video).
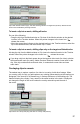
A B
Time navigation controls in the Timeline window
A Time display showing position of current-time indicator B Current-time indicator
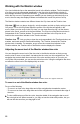
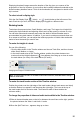
To position the current-time indicator in the Timeline window:
Do any of the following:
• Drag the current-time indicator .
• Click the time ruler where you want to position the current-time indicator.
• Press Shift while dragging the current-time indicator to snap it to the edge of the closest
clip or marker.
• Drag the time display (just above the left edge of the time ruler) to the desired
time value.
• Click the time display (just above the left edge of the time ruler), type a valid time, and
then press Enter. (You don’t need to type leading zeros, colons, or semicolons.
However, be aware that Adobe Premiere Elements interprets numbers under 100
as frames.)
• In the Timeline view of the Monitor window, use any playback control.
You can use the Home or End keys on the keyboard to skip back to the beginning or
ahead to the end of the movie. In addition, the Right or Left Arrow keys on the
keyboard move the current-time indicator forward or back a frame, while pressing
Shift+Right Arrow or Shift+Left Arrow moves it in increments of ve frames.