
User Guide

10
11
3
Editing Movies
About editing a movie
Typically when editing a movie, you’ll initially create a rough cut—a complete yet
relatively crude version of the movie. You arrange the scenes of your movie in the Timeline
window. The Timeline window uses tracks and a time ruler to display the components of
your movie and their relationship to each other over time. It contains two default tracks for
video and still images, and two default tracks for audio. You can add additional tracks at
any time. Tracks let you layer your video or audio. You can place video or still images, such
as titles, on top of each other (superimposing), or add music to play in the background of
your soundtrack. The nal movie combines all the video and audio tracks together.
Using the Timeline window, you place clips in the order you want them viewed. You can
trim and add scenes, indicate important frames with markers, add transitions, and control
how clips blend or superimpose.
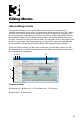
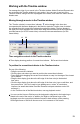
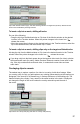
A B C D
E
F
Timeline window
A Selection tool B Razor tool C Time Stretch tool D Time ruler
E Video tracks F Audio tracks