
Operation Manual


Create proxy files for offline editing
Twitter™ and Facebook posts are not covered under the terms of Creative Commons.
Legal Notices | Online Privacy Policy
For a faster workflow, you can work on low-bitrate proxy files (“proxies”) rendered from high-bitrate master files. This article describes how to
create proxy files for offline editing while preserving both the original file naming and source time code.
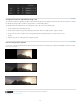
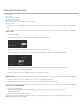
1. Move all the source clips to the Timeline as follows:
a. Browse to the source folder in the SpeedGrade Desktop.
b. Click the Add All button on the lower-right side of the Desktop.
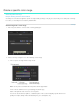
2. Define the output folder for the rendered proxy files as follows:
a. Select the Output tab.
b. Specify an output path in the Folder field with the breadcrumb control.
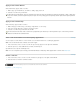
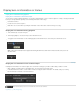
3. Instead of typing a file name for the proxy files, specify the following file naming option:
a. In the File Name field, click the M icon for lists of preset metadata tags.
b. Select the “Src.PathElement.0” option.
This option splits the Timeline into individual QuickTime files for rendering. It also matches the output file name to the source
file name.
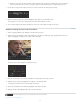
4. Set the Time Code Source to the Source option to preserve the master file time code information.
You can also set the time code source to other time code generators based on the workflow.
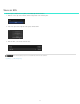
5. Select the output format, calibration lookup table (LUT), and framing settings as with any regular render job.
6. Select Online Quality or Offline Quality and then click Render.
65