
Operation Manual


Twitter™ and Facebook posts are not covered under the terms of Creative Commons.
Legal Notices | Online Privacy Policy
To the top
b. Sample a color range in the image. Click the sample range button (the eyedropper icon with the plus sign), hold down the
left mouse button, and move over the color range you’d like to sample. Release the mouse button when you're done.
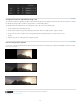
3. Use the Grey-out options in the right corner of the Look panel to view the selected region of the image.
4. Expand or restrict the target color range by dragging the Hue, Lightness, and Saturation sliders.
The top sliders moves the entire selected range. The bottom sliders feather the selection.
5. Color correct the target range using the grading tools such as the contrast slider or the Offset color wheel.
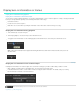
Example: Isolating skin tones with secondaries
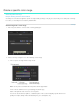
1. Add a secondary grading layer by clicking the +S button in the Look panel.
2. Sample skin tones by clicking the sample range button (the eyedropper icon with the plus sign), holding down the left mouse
button, and dragging a rectangle across a range of skin in the image.
The range selector sliders display the sampled color values:
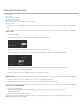
3. View the selected region of the image by selecting the Color/Gray option in the Gray-out menu.
4. Adjust the range selection by dragging the Hue, Lightness, and Saturation sliders.
For example, you want to work on a narrower range of skin tones.
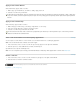
5. Smooth out skin blemishes and wrinkles by dragging the Blur slider to the right.
6. Warm up skin tones by dragging the Offset hue control toward yellow.
60