
Operation Manual


Work with masks
Twitter™ and Facebook posts are not covered under the terms of Creative Commons.
Legal Notices | Online Privacy Policy
To the top
To the top
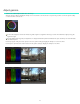
Apply a mask
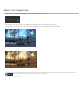
Apply additional masks
Apply a mask
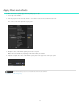
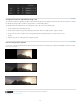
A mask isolates a region of an image so that you can selectively grade the region. In SpeedGrade, a mask is attached to a grading clip.
1. Add a grading clip to a video clip in the video track. See Create a grading clip.
2. Click the Mask tab and select one of the mask presets.
3. Do any of the following to adjust the location, size, and shape of the mask:
To reposition the center of the mask, drag the center cross-hair.
To expand the horizontal size of the mask, drag the horizontal-arrow control to the right or left.
To expand the vertical size of the mask, drag the vertical-arrow control up or down.
To rotate the mask, drag the rotational control curve up or down.
To expand the feather size of the Vignette mask, drag the outer edge feather rectangle control on the lower-left corner of
the widget.
To adjust the angle of the mask, drag the bottom skew control triangle.
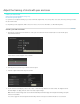
4. Specify the region to grade by clicking the Look tab and select one of the following options in the Layers panel on the left:
Apply Grading Layer to the Outside of a Mask (second icon)
Apply Grading Layer to the Inside of a Mask (third icon)
5. Grade the region defined by the mask.
For example, drag the Gamma Level control on the outside of the Gamma Control wheel to darken the outside of a mask.
Apply additional masks
You can apply additional masks by adding more grading clips to a video track.
1. Add another grading clip to a video track by dragging the Grading Clip icon to the track. See Create a grading clip.
Assign names to the grading clips to organize mask assignments. Double-click the string “untitled grading” of each grading
clip and specify a name. Example: “Vignette Mask.”
2. In the Mask tab, select the new grading clip and then apply a mask and adjust it. See Apply a mask.
For example, add a circle mask preset and adjust it over a subject's face.
3. In the Look tab, specify whether you want to grade the region inside or outside the mask.
4. Grade the region.
For example, drag the Gain control outer-wheel clockwise to brighten the subject’s face.
5. If desired, apply additional masks by adding grading clips.
54