
Operation Manual


Basic workflow
To the top
To the top
Load footage
Apply color grading
Render out content
Special tools and workflows
Related topics
The SpeedGrade workflow consists of three steps: load footage, color grade, and render out finished content.
Use the following views to perform the workflow:
Desktop view for loading footage
Monitor view for applying color grading
Output view for rendering out the completed project
Each view is accessible from a tab at the top of the SpeedGrade CS6 application window.
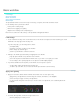
Load footage
1. Locate content in the Desktop view. Use the folder browser on the left side to navigate to the folder containing your content.
Thumbnails of the clips appear in the Desktop view.
If you have many clips, you can manage them as follows:
Sort alphabetically.
Sort by time code range, resolution, or date modified.
Filter to display only certain file types.
Search for specific filenames or filename extensions.
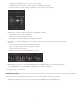
2. Add clips to the Timeline by double-clicking or dragging them to the Timeline.
Drag clips by their handles to reposition them on the Timeline.
Set in- and out-points and switch between Timeline views as you review or color grade your content
You can add up to nine separate playheads. See Compare shots with multiple playheads.
3. If you want, load Edit Decision Lists (EDLs) on the Timeline. See Color grade a sequence.
To add an EDL, double-click the EDL in the Desktop view.
To add the clips to the EDL, choose Reels in the Timeline panel and click Load from Desktop.
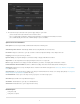
Apply color grading
1. Apply color correction to balance blacks and whites and to match shots. See Color grade a clip.
Apply primary color adjustments to the whole image, the shadows, the midtones, or the highlights.
Select color ranges to apply secondary color adjustments.
Use the waveform, histogram, and vectorscope to ensure accurate color adjustments, such as balancing blacks and
highlights.
2. Use effects, film-style filters, and masks to design creative looks.
Add new grading layers to build your look.
2