
Operation Manual


70
Managing looks
Last updated 11/30/2015
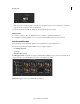
Minimized Browser View Displays the Look Manager in a tabbed-browser view without displaying any thumbnails.
This view gives the Monitor panel more screen space for your grading work.
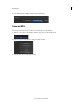
Apply a Look
Apply a Look in SpeedGrade
1 Select a clip or grading track.
2 In the Look Manager, navigate to the folder containing the .Look file you want to use. Use the left and right arrow
keys to navigate to more folders.
3 Click on the .Look file to apply it.
You can also drag the .Look file on the Timeline. It appears as a grading clip that you can resize and reposition to apply
the look across multiple clips, scenes, or a whole project.
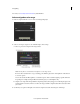
Hover to preview a Look
1 If you hover over a Look thumbnail, you can view how that Look impacts your image in the monitor. This makes it
incredibly easy to test and compare Looks.
2 To apply the Look, click on it. Alternatively, you can drag the Look thumbnail into the grading layer stack, where it
appears as a new Group, and is automatically applied to the image.
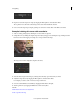
Apply a Look in After Effects
Adobe After Effects supports native .Look files.
1 With footage open in After Effects, select Effect > Utility > Apply Color LUT.
2 Select the .Look file from your hard disk.
To blend the look in After Effects, create an adjustment layer above the clip in the Timeline, then apply the look (Effect
> Utility > Apply Color LUT). In the Timeline, select the adjustment layer, then press the T key to bring up the
transparency control. Adjust the transparency to blend the look.
Apply a Look in Photoshop
Adobe Photoshop supports native .Look files.
1 With an image open in Photoshop, select Image > Adjustments > Color Lookup.
2 In the Color Lookup dialog box, select the Load 3D LUT option.
3 Select the .Look file from your hard disk and click OK.
For more control over the look, create a Color Look Up adjustment layer. Select Layer > New Adjustment Layer > Color
Lookup, and then select the .look file from the context menu.