
Operation Manual


66
Color grading
Last updated 11/30/2015
4 Expand or restrict the target color range by dragging the Hue, Lightness, and Saturation sliders.
The top sliders moves the entire selected range. The bottom sliders feather the selection.
5 Color correct the target range using the grading tools such as the contrast slider or the Offset color wheel.
Example: Isolating skin tones with secondaries
1 Add a secondary grading layer by clicking the +S button in the Look panel.
2 Sample skin tones by clicking the sample range button (the eyedropper icon with the plus sign), holding down the
left mouse button, and dragging a rectangle across a range of skin in the image.
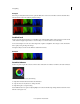
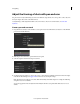
The range selector sliders display the sampled color values:
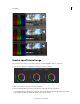
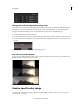
3 View the selected region of the image by selecting the Color/Gray option in the Gray-out menu.
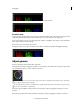
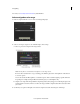
4 Adjust the range selection by dragging the Hue, Lightness, and Saturation sliders.
For example, you want to work on a narrower range of skin tones.
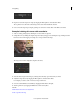
5 Smooth out skin blemishes and wrinkles by dragging the Blur slider to the right.
6 Warm up skin tones by dragging the Offset hue control toward yellow.
See also
Make initial contrast and color adjustments
Grade a specific tonal range