
Operation Manual


49
Color grading
Last updated 11/30/2015
Masking in Premiere Pro
You can leverage the powerful masking and tracking workflows from After Effects directly within Premiere Pro.
Masks let you define a specific area in a clip that you want to blur, cover, highlight, apply effects, or color-correct.
You can create and modify different shaped masks, like an Ellipse or a Rectangle. Or, you can draw free-form Bezier
shapes using the Pen tool.
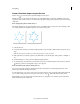
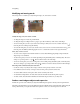
A Ellipse shape tool B Rectangle shape tool C Pen tool
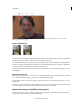
You can apply effects either inside or outside the masked area. One of the common uses of masking is to blur a person's
face to protect their identity. For example, you can mask a person's face by applying a Blur effect or a Mosaic effect.
You can also use masking in more creative ways like applying a mask to correct a specific color. You can use an inverse
mask selection to exclude the masked area from color corrections applied to the rest of the clip. In addition, you can
add multiple shape masks with different effects to different areas of a clip.
Create a mask using shape tools
Premiere Pro provides you two shape tools: An Ellipse shape tool to create a circular or ellipse-shaped mask, and a
Rectangle shape tool to create a four-sided polygon.
1 In the Timeline, select the clip containing the area that you want to mask.
2 From the Effects panel, select the effect that you want to apply to the masked area.
For example, if you want to apply the Mosaic effect, select Video Effects > Stylize > Mosaic.
3 Apply the selected effect to a clip by dragging the effect icon from the Effects panel to the clip in the Timeline panel.
Alternatively, select the clip and double-click an effect in the Effects panel to apply it.
You can apply the same effect multiple times by using different settings each time.
For more information on applying an effect, see Apply effects to clips .
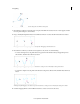
4 Click the Ellipse shape tool to create an Ellipse-shaped mask or click the Rectangle shape tool to create a
rectangle-shaped mask.
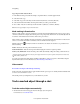
The shape mask appears in the clip displayed in the Program Monitor, and the effect is constrained within the
masked area.
Important notes
• Premiere Pro does not save masks as effects presets.
• Masking is disabled for the Warp Stabilizer effect. The mask shape controls do not appear for the Warp Stabilizer
effect in the Effect Controls Panel.