
Operation Manual


48
Color grading
Last updated 11/30/2015
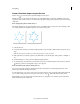
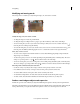
3 Do any of the following to adjust the location, size, and shape of the mask:
• To reposition the center of the mask, drag the center cross-hair.
• To expand the horizontal size of the mask, drag the horizontal-arrow control to the right or left.
• To expand the vertical size of the mask, drag the vertical-arrow control up or down.
• To rotate the mask, drag the rotational control curve up or down.
• To expand the feather size of the Vignette mask, drag the outer edge feather rectangle control on the lower-left
corner of the widget.
• To adjust the angle of the mask, drag the bottom skew control triangle.
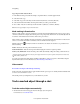
4 Specify the region to grade by clicking the Look tab and select one of the following options in the Layers panel on
the left:
• Apply Grading Layer to the Outside of a Mask (second icon)
• Apply Grading Layer to the Inside of a Mask (third icon)
Note: The first icon -- do not apply the grading to a mask -- is selected by default. The last three icons on the right specify
whether to apply a grading layer to the alpha or inverted alpha channel (neither by default).
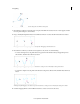
5 Grade the region defined by the mask.
For example, drag the Gamma Level control on the outside of the Gamma Control wheel to darken the outside of a
mask.
Apply additional masks
You can apply additional masks by adding more grading clips to a video track.
1 Add another grading clip to a video track by dragging the Grading Clip icon to the track. See Create a grading clip.
Assign names to the grading clips to organize mask assignments. Double-click the string “untitled grading” of each
grading clip and specify a name. Example: “Vignette Mask.”
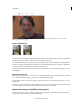
2 In the Mask tab, select the new grading clip and then apply a mask and adjust it. See Apply a mask.
For example, add a circle mask preset and adjust it over a subject's face.
3 In the Look tab, specify whether you want to grade the region inside or outside the mask.
4 Grade the region.
For example, drag the Gain control outer-wheel clockwise to brighten the subject’s face.
5 If desired, apply additional masks by adding grading clips.
Masking and Tracking