
Operation Manual


40
Color grading
Last updated 11/30/2015
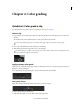
3 View the portion of the image targeted by the hue range selection by selecting an option from the Gray-out menu at
upper-right corner of the Look tab.
4 Make adjustments and refinements to the selection using the upper triangles of the sliders. Use the lower triangles
of the sliders to adjust fall-off.
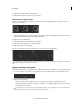
5 Make secondary corrections with the Off-set and Gain control wheels in the center of the Look window.
6 Soften and blend secondary corrections using the Denoise and Blur sliders on the right of the Look window.
7 After making secondary corrections, set Gray-out to None.
Render a graded clip
1 Click the Output tab in the upper-right corner to open the Metadata Render Engine.
2 Click the Desktop menu and select a destination folder.
3 Assign a name to the rendered file in the File Name textbox.
4 In Format & Options, select a output file format for the render.
If a desired preset doesn’t exist, create a new one by clicking Other.
5 Click Online Quality in the Render section.
6 Click Render.
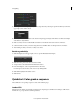
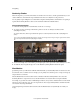
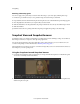
Quickstart: Color grade a sequence
The workflow for color grading a sequence consists of the following steps:
Load an EDL
Edit Decision Lists (EDLs) are metadata documents used to migrate project timelines from editing tools like Adobe
Premiere Pro to post-production tools like SpeedGrade.