
Operation Manual

35
Loading footage
Last updated 11/30/2015
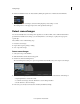
4 Enable and disable the audio of a selected track by clicking the speaker icon on the left side of the Timeline.
5 To change values for sound output, such as the mixing frequency, select Settings > Sound.
The Settings menu is on the upper-right corner of the SpeedGrade workspace.
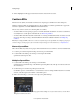
Detect scene changes
You can automatically detect scene changes in footage that does not have an EDL, such as archived material. Once
SpeedGrade has identified scene changes, you can add keyframes to scene changes, or split your footage up into
separate clips.
The workflow consists of the following steps:
1 Detect the scene changes.
2 Prepare the footage for grading or editing.
3 Save or export the footage.
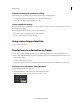
Detect scene changes
1 Select your footage on the Timeline.
2 Click the Timeline tab and select the Setup panel.
3 Under Tools, click Scene Change Detect.
The Scene Change Detect dialog box opens and SpeedGrade automatically scans your footage for scene changes.
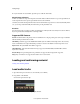
4 When the scan is complete, you can review the results using the arrow buttons on the left side of the dialog box.
• Step through frames to review the content.
• To confirm scene changes, select the This Frame is a Scene Change checkbox.
• Use the checkbox to add scene changes.
5 If necessary, you can adjust scene detection sensitivity and click Rescan Clip.