Adobe® Speedgrade CC Help TM
Legal notices Legal notices For legal notices, see http://help.adobe.com/en_US/legalnotices/index.html.
iii Contents Chapter 1: What's new New features summary . . . . . . . . . . . . . . . . . . . . . . . . . . . . . . . . . . . . . . . . . . . . . . . . . . . . . . . . . . . . . . . . . . . . . . . . . . . . . . . . . . . . . . . . . . . . . . . . .1 Chapter 2: Workspace SpeedGrade workspace . . . . . . . . . . . . . . . . . . . . . . . . . . . . . . . . . . . . . . . . . . . . . . . . . . . . . . . . . . . . . . . . . . . . . . . . . . . . . . . . . . . . . . . . . . . . . . . . .3 Desktop basics . . .
iv SPEEDGRADE Contents Apply filters and effects . . . . . . . . . . . . . . . . . . . . . . . . . . . . . . . . . . . . . . . . . . . . . . . . . . . . . . . . . . . . . . . . . . . . . . . . . . . . . . . . . . . . . . . . . . . . . . . 62 Adjust the framing of shots with pan and scan Grade a specific color range Stereoscopic workflows . . . . . . . . . . . . . . . . . . . . . . . . . . . . . . . . . . . . . . . . . . . . . . . . . . . . . . . . . . . . . . . . . . . . . . . . 63 . . . . . . . . . .
1 Chapter 1: What's new New features summary What's new and changed The 2015 release of Adobe SpeedGrade CC provides Premiere Pro color workflows with direct link, optimized scopes for better performance, and new SpeedLooks presets. Read on for a quick introduction to the new features and links to resources offering more information. SpeedLooks presets This release of SpeedGrade provides you a wide variety of Look color presets to apply to your media.
2 What's new Premiere color workflows editable in SpeedGrade SpeedGrade has been integrated with the new color workflows in the 2015 release of Premiere Pro CC. When you send a project to SpeedGrade using Direct Link, SpeedGrade presents you with the Lumetri Color layer. This custom layer reflects all the color changes that you had made to your project in one layer without any custom controls. The Lumetri Color layer is displayed only if you have applied color changes in Premiere Pro.
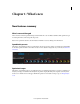
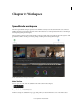
3 Chapter 2: Workspace SpeedGrade workspace The Adobe SpeedGrade workspace provides a more familiar screen layout for Adobe Premiere Pro users. There is a familiar placement of user interface elements such as the media browser, a redesigned autofit monitor, Look Manager, and integrated grading and mask panes. The use interface contains a main toolbar and tabs on the upper right of the screen.
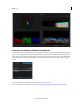
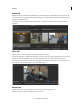
4 Workspace Media Tab Click the Media tab to launch the new Media Browser. The Media Browser, formerly called the Desktop view, is the main interface for browsing through, locating, and loading your assets. Thumbnails of the files in the Desktop view are displayed in the Media Browser. You can adjust the size of the thumbnails using the slider, and watch a quick preview of the video clip within the thumbnail. Color Tab Click the Color tab to view the Monitor panel and the Analysis Tools panel.
5 Workspace Result Tab Click the Result tab to open the folder of the last render session. Mask and Look panels The Mask panel is now placed next to the Look panel. WIth the masking and grading tools placed side-by-side, you can now work faster on the mask workflow. Desktop basics Use the Desktop view to find and load footage. You can navigate to folders with image sequences, movie files, or RAW file formats. Thumbnails of the files are displayed in the Desktop view.
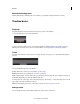
6 Workspace Refresh the Desktop view Click the Refresh button. Refreshing the view is useful if you updated files while SpeedGrade was running. Timeline basics Playhead The playhead displays a frame in the Monitor at any given position on the Timeline. ? Drag the playhead to move it along the Timeline. To view more than one frame at a time, create additional playheads. Multiple playheads are useful for comparing different parts of the same shot or scene.
7 Workspace • To show or hide the track, click the Eye icon. • To lock or unlock the track, click the Lock icon. • To delete the track, click the Drag icon and drag the track off the Timeline. Play a part of the Timeline Specify the part of the Timeline to play by repositioning in- and out-points. The two points are located above the tracks, at either end of the clip or playlist. Note: In- and out-points in SpeedGrade are not used to edit clips as in Adobe Premiere Pro. They're used to control playback.
8 Workspace More Help topics Keyboard shortcuts Zoom the Timeline 1 Select the Master Timeline view from the view menu on the upper-left side of the Timeline. 2 Press Ctrl+Scrollwheel. Note: Zooming works only in the Master or Playhead view of the Timeline. See Change the Timeline view . Delete the Timeline Click the Delete (X) icon on the right side of the Timeline and confirm that you want to delete the Timeline. Playback basics Playback shortcuts Note: Close the Desktop before playback (press D).
9 Workspace Playback indicators The playback indicators on the left side of the Timeline provide the following information, from left to right: • The current base frame rate • The playback frame rate • The disk performance indicator • The monitor performance indicator The disk performance indicator turns red when one of the disks or the CPU cannot deliver real-time decoding at the desired playback speed.
10 Workspace Create an additional playhead ? Hold the Control (Windows) or Command (Macintosh) key down and drag the Move Playhead icon anywhere in the Timeline. The Move Playhead icon is the arrow icon on the right side of the playhead controller. Make sure a green Plus (+) icon appears on the left side of the playhead controller before dropping the playhead. Select a master playhead When working with multiple playheads, select a master playhead to make grading and other adjustments.
11 Workspace Keyboard shortcuts Result Windows Mac OS Change the current split-screen mode F9 Cmd+F9 Change the horizontal or vertical orientation of split-screen mode. F10 Cmd+F10 Flip the channel position of the split-screen mode. F11 Cmd+F11 Note: The default F key assignments must be disabled on Mac OS systems. In System Preferences, select Keyboard, then the Keyboard Shortcuts panel. Select Expose & Spaces and deselect the default key assignments.
12 Workspace You can also open the Desktop view, navigate to the folder that contains the ircp file that you want to load, and double-click the file thumbnail. Save a project SpeedGrade saves the status of your work every 5 seconds. However, saving the current project from time to time is recommended. Multiple saves are useful for reverting to a previous version you liked better. ? Press Ctrl+S (Windows) or Cmd+S (Macintosh).
13 Workspace Rename a project 1 Use the Desktop view to navigate to the folder that contains the ircp file that you want to remane. 2 Right-click the ircp file, select Rename from the context menu, and rename the file. Delete a project 1 Use the Desktop view to navigate to the folder that contains the ircp file that you want to delete. 2 Right-click the ircp file and select Delete from the context menu.
14 Workspace Only two outputs at a time can be used in parallel. The SDI card is routed through the Quadro GPU and thus takes one DVI or DP output. The other output can be used for the workspace display. The additional DisplayPort is not active in parallel. Tip: Combining local footage display with a projection setup To give the operator an accurate local display in parallel to another display or projection system, a signal split on the SDI output is recommended.
15 Workspace Step 1: Select Premiere Pro sequence Select the Premiere Pro sequence that you want to color grade. Note: Ensure that you have selected the sequence in the Timeline or Project panel. Step 2: Send sequence to SpeedGrade using Direct Link Using Direct Link, you can send a sequence from an open Premiere Pro project directly to SpeedGrade without exporting the project. To use Direct Link, select File > Direct Link To Adobe SpeedGrade.
16 Workspace Step 5: Color grade the sequence using grading and mask tools Within SpeedGrade, you can color grade the sequence using Looks and Masks. The Looks that you apply in SpeedGrade appear as Lumetri presets when you reopen the sequence in Premiere Pro. If a Lumetri Look has already been applied in Premiere Pro, it's available in the SpeedGrade Timeline, where you can adjust its parameters.
17 Workspace The color graded sequence opens in Premiere Pro with all color grading fully intact. Color grading and masks applied in SpeedGrade are visible in Premiere Pro as Lumetri effects. In Premiere Pro, you can turn these Lumetri effects on or off for each clip and for each adjustment layer individually using the Effects Controls panel. You continue editing or export your sequence for final output in Premiere Pro.
18 Workspace Working with offline media When you open a Premiere Pro project with missing media files in SpeedGrade, you cannot link and locate the offline media like you would in Premiere Pro. To relink the offline media, you must bring the project back to Premiere Pro.
19 Workspace Image analysis tools SpeedGrade provides various tools, like the following, to analyze your image: • Histogram • Vectorscope • RGB Parade • Luma Waveform These tools are now grouped together and available from the Analysis Tools panel. To display the Analysis Tools panel, use the keyboard shortcut A, or click the arrow on the upper-left Monitor panel. You can adjust the size of the Analysis Tools panel using the drag handles. Use the context menu to choose which video scope you want to view.
20 Workspace Vectorscope The Vectorscope displays the video’s chrominance information in a a circular chart. Saturation is measured from the center of the chart outward. Vectorscopes work in YUV and HLS (Hue, Lightness, Saturation) modes. The YUV Vectorscope uses the more familiar YUV color space including color targets to display the pixel distribution in your images more intuitively. The YUV vectorscope is the default option.
21 Workspace Luma Waveform The Luma Waveform scope displays a representation of the luminance of your images, similar to how it is displayed in Premiere Pro. High luma levels appear as spikes on the waveform, and low luma levels appear as dips. This scope lets you quickly identify highlights and shadows in your image, helping you achieve precise black-and-white balancing. Channel views Use channel views to check specific color channels.
22 Workspace To see a channel on the Monitor, follow these steps: 1 Select the Timeline tab, and then select View. 2 Select a channel from the Channel View menu under Display Options. For example, if your image includes an alpha channel, select Alpha Channel to view on the Monitor. To switch back to normal view, select the channel view as Normal View.
23 Workspace Note: Use the paused image resolution to see more image detail. Set it as high or higher than the selected playback resolution. 4 If working with formats that have a native color depth greater than 8 bits per channel, you can set the color depth for playback and paused images as well. Crop the display frame You can set the display size of your frames by cropping them in the monitor. Cropping frames in the monitor does not modify the source material.
24 Workspace 3 Change the display aspect ratio by selecting an option from the menu. 4 To switch to the default aspect ratio, click the icon again. More Help topics Crop the display frame Work with keyframes Use keyframes to transform the state of a grade, mask, or pan-and-scan adjustment over time. A keyframe marks the point in time where you specify a state, such as the position of a mask.
25 Workspace Workflow for creating dissolves between keyframes Create a dissolve between two keyframes by clicking the Record Keyframe button a second time at each new keyframe position. The typical workflow is as follows: 1 Move the playhead to the position on the timeline where you want to start the dissolve. 2 Add a keyframe by clicking Record Keyframe. 3 Move to the playhead to the position on the timeline where you want to end the dissolve.
26 Workspace Keyframes on other grading, mask, or pan-and-scan tracks above or below the current grading clip are not affected. Related topics • Quickstart: Color grade a clip • Track a masked object through a shot • Adjust the framing of shots with pan and scan Keyboard shortcuts Print a PDF of the keyboard shortcuts The keyboard shortcuts for SpeedGrade CC are available as a downloadable PDF from here. For the F-key shortcuts to work on Mac systems, press the fn key and then the F-key.
27 Workspace Show the Reel browser Ctrl+Alt+R Cmd+Alt+R Close Preferences window Esc Esc Close application Alt+F4 Cmd+Q Result Windows Mac OS Play/Pause [space] [space] Reverse playback Shift+[space] Shift+[space] Step back one frame Left Arrow Left Arrow Step forward one frame Right Arrow Right Arrow Decrease playback FPS PgDn PgDn Increase playback FPS PgUp PgUp Double frames per second Numpad * Numpad * Halve frames per second Numpad / Numpad / Switch between single p
28 Workspace Pan and zoom view shortcuts Result Windows Mac OS Pan up/down Shift+Up/Down Arrow Shift+Up/Down Arrow Pan left/right Shift+Left/Right Arrow Shift+Left/Right Arrow Reset pan Shift+Home Shift+Home Match channel sizes Alt+Home Alt+Home Zoom in/out Numpad +/- Numpad +/- Zoom to 100% Shift+Ctrl+Home Shift+Cmd+Home Zoom to fit Ctrl+Home Cmd+Home Splitscreen view shortcuts Result Windows Mac OS Change the splitscreen mode F9 Cmd+F9 Change the vertical/horizontal orientat
29 Workspace Reset in- and out-points to default positions Shift+Ctrl+Alt+O Toggle In/Out point settings between current clip and Home/End of timeline Ctrl+[space] Reload replaced frames on disk Shift+F5 Grading shortcuts Result Windows Mac OS Toggle grading on/off 0 (zero) 0 (zero) Apply previewed preset to the timeline Enter Enter Reject previewed preset Backspace Backspace Change color selector mode Shift+Enter Shift+Enter Reset grading on current clip Shift+Alt+Delete Shift+Alt+D
30 Workspace Gray-out shortcuts Result Windows Mac OS Turn on gray-out Ctrl+G Cmd+Shift+G Turn on black-out Alt+G Alt+G Turn on white-out Ctrl+Alt+G Cmd+Alt+G Turn off gray-out Shift+Alt+G Shift+Alt+G Result Windows Mac OS Toggle selected dissolve clip’s direction (bottom-to-top/top-to-bottom) Shift+D Shift+D Split currently active clip and all clips directly above it at the master playhead position Shift+Alt+S Shift+Alt+S Splits currently active clip at the master playhead position
31 Chapter 3: Loading footage Supported file formats Frame sequence formats Format Read Write Cineon Yes Yes DPX, DPX 2.
32 Loading footage RAW file formats The supported RAW formats are read-only. • ARRI Alexa .ari • ARRI D21 .ari • Phantom HD / GOLD / FLEX / 65 (.cine) • REDCode RAW (.r3d) • Silicon Imaging SI 2K/SI Mini (Uncompressed .siv) • Weisscam HS-1/HS-2 RAW (.wcr) • Weisscam HS-2 Digimag (.fhg*) Load footage Load items Add items to the Timeline as follows. • Navigate to the item in Desktop view, then double-click the thumbnail. You can also drag an item to the Timeline. • Repeat the process to add more items.
33 Loading footage 2 When a highlighted red line appears at the desired location, release the mouse button. Conform EDLs Edit Decision Lists (EDLs) are metadata documents used to migrate project timelines from other editing tools. Timelines created from EDLs in SpeedGrade adhere to the Sony CMX 3600 standard. SpeedGrade also supports the extended 16-digit EDL to work with ARRIRAW and Red R3D material.
34 Loading footage 4 If your material is in several folders, repeat the process with the other folders. About footage references An EDL can reference footage with a clip name and reel ID. If the reel ID information is not present, SpeedGrade can use the clip name. If both are present, SpeedGrade references the reel ID first Sometimes, the reel ID and clip name information don’t match and the footage can't be associated automatically.
35 Loading footage 4 Enable and disable the audio of a selected track by clicking the speaker icon on the left side of the Timeline. 5 To change values for sound output, such as the mixing frequency, select Settings > Sound. The Settings menu is on the upper-right corner of the SpeedGrade workspace. Detect scene changes You can automatically detect scene changes in footage that does not have an EDL, such as archived material.
36 Loading footage Prepare the footage for grading or editing After marking your scene changes, prepare the footage for grading or editing as follows: • To separate the footage into individual shots or scenes, click Split into Clips. • To flag the scene changes, click Add Keyframes to Clip. Save or export the footage Once you split into clips or add keyframes, you can save the scene-detected content as a SpeedGrade project or create an Edit Decision List (EDL).
37 Loading footage Display burn-in information on the rendered output Including burn-in information on rendered output can be useful when creating proxy media for offline editing or dailies for review. • When setting the rendering options in the Output panel, select a burn-in preset from the menu. • In the Flash Burn-In For text box, set the number of frames to display the burn-in information. The default setting is 0, meaning burn-in information is included on all rendered frames.
38 Chapter 4: Color grading Quickstart: Color grade a clip To load an EDL and color grade a sequence, see Quickstart: Color grade a sequence. Select a clip 1 In SpeedGrade, select a folder that contains video clips using the file browser in the upper-left corner of the user interface. The Desktop window shows thumbnail versions of the content in the selected folder. To filter the thumbnails by file type, select All Files in the upper-right corner and then select a file type.
39 Color grading 2 Swipe the mouse left or right to change the value. 3 Right-click the triangle icon again to accept the setting. Make changes to specific regions Modify color and luminance values in the image's shadow, midtone, and highlight regions using the color control wheels on the Look panel. To adjust the luminance, do the following: • Left-click the triangle icon on a wheel and drag the mouse left or right in a straight line. Don't drag the mouse in a circle.
40 Color grading 3 View the portion of the image targeted by the hue range selection by selecting an option from the Gray-out menu at upper-right corner of the Look tab. 4 Make adjustments and refinements to the selection using the upper triangles of the sliders. Use the lower triangles of the sliders to adjust fall-off. 5 Make secondary corrections with the Off-set and Gain control wheels in the center of the Look window.
41 Color grading Tip: Before starting, place the source clips and the EDL file in a single folder. This organization makes the process quicker and more efficient. 1 In SpeedGrade, select the folder containing the EDL file with the file browser in the upper-left corner of the user interface. 2 Double-click the EDL file to load it. Tip: If you have too many thumbnails, you can filter them for EDL files by selecting the EDL option from the All Files menu in the upper-right corner.
42 Color grading ? To create a grading clip for a single video clip, drag the Grading Clip tool into the grading track above the target clip. ? To add grading clips for all the video clips in the video track, drag the Grading Clip tool on a video clip in the video track. Apply color grades to a grading clip 1 Select a grading clip in the Timeline, not a video clip. 2 Apply color grades to the selected grading clip. For more information on grading, see Quickstart: Color grade a clip.
43 Color grading Adobe Premiere Pro and SpeedGrade workflows The color grading process is usually the last step in the post-production workflow. If working with high-resolution material or RAW files, you can begin your workflow by creating smaller proxy files in SpeedGrade for offline editing in Adobe Premiere Pro. After your editing is complete, you can relink the edits to the source material in SpeedGrade for grading and finishing. General editing and grading workflow 1 Edit in Adobe Premiere Pro.
44 Color grading Continuity Checker When shooting video, you can have unintended color variations from one shot to another. SpeedGrade lets you even out these differences, and balance the clips such that the video flows smoothly from one clip to the next. You can quickly compare multiple shots on the timeline using the Continuity Checker, and match the color grading as required. The Continuity Checker is often used in combination with the Shot Matcher feature.
45 Color grading When you use Shot Matcher, SpeedGrade adds an adjustment layer to your grade for that clip. You can adjust the opacity or add additional corrections as required. Note: If you try to match shots between two distinctly different scenes, you can get inappropriate results. Using Shot Matcher Move the playhead to the frame in your sequence that you want to match. Say, Clip A. 1 Move the playhead to the frame in your sequence that you want to match. Say, Clip A. 2 Create a second playhead.
46 Color grading Matching a Photoshop grade You can now apply a color grade that you create in Adobe Photoshop to your video clip by following these steps: 1 In Photoshop, use all the necessary tools to grade the image, and save the image as a TGA file. 2 In SpeedGrade, reference the TGA file using the new Snapshot browser. A thumbnail of the graded image appears. 3 Move the playhead to the frame in your sequence that you want to match.
47 Color grading 3 The saved snapshot is saved as a TGA file along with a JPG thumbnail preview (160x45 pixel). You can view the saved images using the Snapshots browser. The Snapshots browser provides a collapsible treeview structure with multiple tab support. The snapshots are stored in the following default locations on your computer file system: • Mac: /Users/Documents/Adobe/SpeedGrade/7.0/settings/snapshots/ • Win: C:\Users\[user name]\AppData\Roaming\Adobe\SpeedGrade\7.
48 Color grading 3 Do any of the following to adjust the location, size, and shape of the mask: • To reposition the center of the mask, drag the center cross-hair. • To expand the horizontal size of the mask, drag the horizontal-arrow control to the right or left. • To expand the vertical size of the mask, drag the vertical-arrow control up or down. • To rotate the mask, drag the rotational control curve up or down.
49 Color grading Masking in Premiere Pro You can leverage the powerful masking and tracking workflows from After Effects directly within Premiere Pro. Masks let you define a specific area in a clip that you want to blur, cover, highlight, apply effects, or color-correct. You can create and modify different shaped masks, like an Ellipse or a Rectangle. Or, you can draw free-form Bezier shapes using the Pen tool.
50 Color grading Create a free-form shape using the Pen tool The Pen Tool lets you freely draw complex mask shapes around objects. Click the Pen tool to begin drawing the mask. You can create different shapes by drawing straight lines and curved segments. To draw smooth curves, you can draw Bezier path segments that provide you greater control over the shape of the mask.
51 Color grading A Two-directional Bezier handles to control the shape of the curve B Bezier mask points 1 Place the Pen tool where you want the curve to begin, and hold the mouse button down. A vertex appears, and the Pen tool pointer changes to an arrowhead. 2 Drag to modify the length and direction of both direction lines for a vertex, and then release the mouse button.
52 Color grading Modifying and moving masks The vertex points on a mask let you easily manage the shape, size, and rotation of a mask. Modify the shape, size, and rotation of a mask • To change the shape of a mask, drag a mask handle. • To change the shape of an ellipse mask to a polygon, press Alt and click any of the vertices of the ellipse. • To resize a mask, place your cursor just outside a vertex and press Shift (cursor becomes a double-sided arrow then drag the cursor while pressing the Shift key.
53 Color grading A Feather handle to control feathering B Expansion handle to expand and contract the mask C Mask position handle to move controls D Expansion guide E Feathering guide Apply mask feathering A Without feathering B With feathering applied Smooth the edges of a mask shape by applying feathering. Feathering softens the mask selection border so that it blends into the area outside the selection, and provides an aesthetically pleasing result.
54 Color grading A Track the mask B Invert masked and unmasked areas C Change mask expansion D Adjust mask opacity E Feather mask edges Adjust mask opacity To adjust the opacity of a mask, specify a Mask Opacity value. The slider controls the mask opacity. At a value of 100, the mask is opaque and blocks out any underlying area of the layer. As you lower the opacity, more of the area under the mask becomes visible.
55 Color grading Copy and paste masks between effects 1 In the Effect Controls panel, click the triangle to expand the effect to reveal the applied masks. 2 Select the mask to copy. 3 Select Edit > Copy. Or use the keyboard shortcut Ctrl+C (Windows) or Cmd+C (Mac OS). 4 Select another effect in the Effects Control panel to which you want to paste the mask. 5 Choose Edit > Paste. Or use the keyboard shortcut Ctrl+V (Windows) or Cmd+V (Mac OS). Note: You can copy and paste only one mask at a time.
56 Color grading 2 In the Mask panel, click the Track Object button. The button is on the lower-right side of the Mask panel. You might need to scroll the panel down to see it. The mask automatically tracks the target object through the shot.
57 Color grading 6 If necessary, add more keyframes and adjust the position of the mask at each keyframe. More Help topics Work with masks Work with keyframes Color grade a clip Adjust color temperature Adjust the color temperature by dragging the Color Temperature slider in the Look panel. If the image is too warm, lower the color temperature by dragging the Color Temperature slider to the left.
58 Color grading Balance blacks and whites Balancing blacks is the first step in the color correction workflow. You can use the Offset color wheel or the vertical slider in the Look panel to balance blacks. Once the blacks look good, move on to balancing the whites. Use the Gain color wheel or vertical slider in the Look panel to balance whites. Note: To use RGB sliders instead of the color wheels. Click the Sliders mode button on the upper-left of the coloring tools.
59 Color grading Example If the image is tinted yellow in the shadows, push the Offset hue control tool toward blue to balance the black values. The adjustment results in the following waveform change. Set black level In the Look panel, drag the triangle icon on the Offset control wheel until the valleys of the waveform rest on the 0 level of the waveform display. Drag clockwise to raise the valleys or counter-clockwise to lower the valleys.
60 Color grading Pushing the gain hue control tool toward cyan and blue balances out the shadows. Set white level In the Look panel, drag the triangle icon on the Gain control wheel until the peaks of the waveform touch the 100 level of the RGB waveform display. Drag clockwise to lift the peaks or counter-clockwise to lower the peaks. To move the triangle icon on the color wheel, drag it left or right in a straight line. Don't drag in a circle. The further left or right you drag, the larger the change.
61 Color grading Grade a specific tonal range You can make color corrections to a specific tonal range, such as the highlights, shadows, or midtones. 1 Select Shadows, Midtones, or Highlights on the upper part of the Look panel. 2 Make color corrections using the color wheels and sliders. 3 Extend or limit the affected tonal range using the slider on the right side of the color wheels. For example, if grading in the shadows, pushing the slider up extends the changes into the midtone region of the image.
62 Color grading Secondary color correction Secondary color correction Apply filters and effects Use filters and effects to quickly apply advanced grading styles to clips. 1 Load a clip on the Timeline. 2 In the Layers panel on the Look tab, click the + icon and then select an effect or filter from the menu. The + icon is on the lower part of the Layers panel. 3 Modify the effect or filter with the grading tools in the Look panel.
63 Color grading Adjust the framing of shots with pan and scan Use pan and scan to adjust the framing of your shots for different output formats. You can reposition, scale, rotate, and skew your image to fit best into other frame format. Use keyframing to make adjustments within a shot or from shot to shot. For more information, see Work with keyframes. Create a pan and scan track 1 Drag the Pan & Scan button on the timeline to create a pan and scan track.
64 Color grading Change pan-and-scan adjustments along a clip The pan and scan track is a global track along the entire timeline. Any pan-and-scan adjustments affect the whole clip. Use keyframes to change the adjustments along the clip. For details on using keyframes, see Work with keyframes. The typical workflow for making pan-and-scan adjustments along a clip consists of the following steps. 1 Create a keyframe at the beginning of the clip.
65 Color grading For a video, see Secondary Color Correction by Patrick Palmer. Select and grade a color range 1 In the Look panel, click the +S icon to add a secondary grading layer. 2 Select a color range to target. Do one of the following to select a range: a Choose a preset color range from the range selector. Note: You may have to scroll down the Look panel to see the range selector.
66 Color grading 4 Expand or restrict the target color range by dragging the Hue, Lightness, and Saturation sliders. The top sliders moves the entire selected range. The bottom sliders feather the selection. 5 Color correct the target range using the grading tools such as the contrast slider or the Offset color wheel. Example: Isolating skin tones with secondaries 1 Add a secondary grading layer by clicking the +S button in the Look panel.
67 Color grading Adjust color temperature Quickstart: Color grade a sequence Balance your shots by removing color casts Stereoscopic workflows Stereoscopic workflows Last updated 11/30/2015
68 Chapter 5: Managing looks Working with Looks Working with Looks Share and reuse looks SpeedGrade can save color grading information in .Look files for reuse. Because the files are small, you can easily store them or share them with others. Speedgrade provides you a wide variety of Look color presets to apply to your media. You can find these looks under Speedlooks Cinelooks in the Look tab. Save and share a Look Save a Look 1 Grade some material.
69 Managing looks Note: If you get an error that the folder is read-only, close SpeedGrade and then run it as administrator. In Windows, right-click the start icon and select Run as Administrator. 3 If desired, rename the .Look file by clicking the current name and typing a new name. Share a Look 1 Locate the .Look file to share. The default location of .Look files is ../SpeedGrade/settings/looks. 2 Send the file as an email attachment or move or copy it to a shared folder in the Cloud or on a network.
70 Managing looks Minimized Browser View Displays the Look Manager in a tabbed-browser view without displaying any thumbnails. This view gives the Monitor panel more screen space for your grading work. Apply a Look Apply a Look in SpeedGrade 1 Select a clip or grading track. 2 In the Look Manager, navigate to the folder containing the .Look file you want to use. Use the left and right arrow keys to navigate to more folders. 3 Click on the .Look file to apply it. You can also drag the .
71 Managing looks Export a Look You can export a .Look file with one or more LUT files to use in Adobe Premiere Pro or a third-party application. Note: LUTs do not include masks or effects such as blur or glow. 1 In the Look Manager, right-click (Win) or Ctrl-click (Mac) the .Look file and select Export Look. 2 Select additional files to include, and click Export. SpeedGrade creates a zip file containing the files.
72 Chapter 6: Rendering out Rendering out your project Rendering out your project Create proxy files for offline editing For a faster workflow, you can work on low-bitrate proxy files (“proxies”) rendered from high-bitrate master files. This article describes how to create proxy files for offline editing while preserving both the original file naming and source time code. 1 Move all the source clips to the Timeline as follows: a Browse to the source folder in the SpeedGrade Desktop.
73 Rendering out 6 Select Online Quality or Offline Quality and then click Render. Save an EDL You can export an Edit Decision List (EDL) of assembled clips from the Timeline. 1 With two or more clips on the Timeline, click the Setup button on the Timeline panel. 2 In the Tools panel on the right side of the panel, click Save EDL. 3 Name the EDL, select a folder, and click Save.
74 Chapter 7: System Requirements Last updated 11/30/2015