
Operation Manual

94
Editing clips
Last updated 10/4/2016
Remove frames from the middle of a clip
You can retain material at the beginning and end of a clip for your movie, but remove material from its middle. Split
the clip right before the unwanted section begins, to create two clips. Then, trim the unwanted material from the
beginning of the second clip.
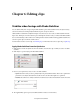
1 In the Quick view timeline, select the clip containing unwanted material. The clip appears in the Monitor panel.
2 Drag the current-time indicator on the Quick view timeline to the frame where the unwanted material begins.
3 Click the Scissor button on the current-time indicator.
The original clip is split into two clips in the Quick view timeline.
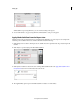
4 Double-click the clip to the right of the split. This opens the clip in the Preview window.
5 In the Preview window, drag the current-time indicator to the frame just after the last frame of unwanted material,
6 Click the Set In Point button. This trims the unwanted material from the beginning of the second clip and shortens
the clip in the Quick view timeline, leaving a gap between it and the clip before.
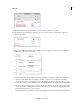
The unwanted material is removed from the beginning of the second clip (or end of the first clip, if you chose to edit
that clip). The gap created between the first and second clips is automatically closed.
7 Right-click/ctrl-click in the gap in the Quick view timeline, and then click Delete And Close Gap.
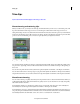
Retrieve frames in the Monitor panel
1 Double-click a clip in the Quick view timeline.
The start and end points of the clip becomes visible in the Preview window of the Monitor panel.
2 In the Preview window, do one of the following:
• To retrieve frames at the beginning of the clip, drag the In point handle to the left.
• To retrieve frames at the end of the clip, drag the Out point handle to the right.
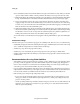
Trim in the Expert view timeline
You can remove or regain trimmed frames from either end of a clip by dragging the clip’s edge in the Expert view
timeline. To help you locate the desired frame, the Monitor panel displays it at the changing In or Out point of the clip
as you drag. If another clip is adjacent to the edge you’re trimming, the Monitor panel displays the frames of both clips
side by side.
The frame on the left (the Out point) is earlier in time, and the frame on the right (the In point) is later in time.
Subsequent clips, as well as blocks of empty space, in the Expert view timeline shift as you drag the clip’s edge.
A tool tip displays the number of frames you are trimming as you trim them. This window displays a negative value if
you drag the clip’s edge toward the beginning of the movie.
It displays a positive number if you drag toward the end of the movie. You can tell whether you have trimmed a clip by
looking for a small gray triangle in the top corner at either end of the clip in the Expert view timeline. The triangle
indicates you have not trimmed that edge.
For linked clips (video that includes a soundtrack), dragging the edge of one clip changes the In or Out points of both
clips. Sometimes you want to trim linked clips independently to create split edits (also known as L-cuts and J-cuts).
Pressing Alt when you trim allows you to set the In and Out points of the video and audio separately.