
Operation Manual

87
Last updated 10/4/2016
Chapter 6: Editing clips
Stabilize video footage with Shake Stabilizer
You can stabilize shaky video footage using the Shake Stabilizer option. Shake Stabilizer removes the jitter caused by
camera movements, transforming shaky, handheld footage into steady, smooth shots.
Shake Stabilizer is available in both Quick and Expert views. H
owever, for best results, use Shake Stabilizer from the
Expert view. The Expert view offers advanced options that help fine-tune the results you achieve with Shake Stabilizer.
It is recommended that you take small sections of the clip that has unwanted shake and then apply Shake Stabilizer. You
c
an trim or split a clip to break it into smaller sections.
For information about how to trim a clip, see Trimming clips . For information about how to split a clip, see Split a clip.
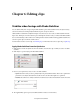
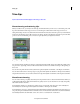
Apply Shake Stabilizer from the Quick view
1 Click Quick to switch to the Quick view. From the timeline, select the video clip on which you want to run Shake
Stabilizer.
2 Click Adjust to open the Adjust panel. Click Shake Stabilizer.
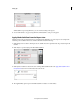
3 Based on your requirements, select a mode to run Shake Stabilizer:
• Quick: Select this mode if you want to quickly analyze a clip and stabilize the shakes. This mode is optimized for
performance as it analyzes alternate frames. It takes less time, but the results might not be optimized.
• Detailed: Select this mode to analyze each frame and achieve better results. The Detailed mode takes more time.
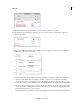
4 The Applied Effects panel is opened, and Shake Stabilizer is added as one of the effects.