
Operation Manual


83
Last updated 10/4/2016
Arranging movie clips
Even if you unlink the clips, Adobe Premiere Elements keeps track of the offset, and displays it again if you relink them.
You can have Adobe Premiere Elements automatically resynchronize the clips. Depending on the clips, you can choose
between two methods of synchronizing.
In the Expert view timeline, right-click/ctrl-click the offset number of the clip you want to move.
The clip you right-click/ctrl-click moves or adjusts to align with the other clip, which remains in place.
Enable and disable clips
Occasionally, you might want to disable a clip while you try a different editing idea or to shorten the processing time.
Disabling a clip hides it when you view the movie in the Monitor panel or when you export the movie. You can still
move or change a disabled clip.
Select one or more clips in the Quick view timeline or the Expert view timeline, and choose Clip > Enable.
The check mark next to the command disappears when you disable a clip, and the clip appears dimmed in the Quick
view timeline and the Expert view timeline.
Working with clip and timeline markers
About clip and timeline markers
You can place markers to indicate important points in a clip or movie. Markers can help you position, arrange, and
synchronize clips. They even let you add comments to the Expert view timeline.
A movie or a clip can contain up to 100 numbered markers (labeled from 0 to 99). Moreover, it can have unlimited
unn
umbered markers. You can also add menu markers for use in creating a disc menu in Adobe Premiere Elements.
Working with clip and timeline markers is much like working with In and Out points. However, In and Out points set
t
he actual start and end points of a clip. Markers are only for reference and do not affect clips in the finished movie.
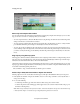
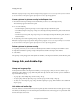
A Timeline Marker B Menu marker C Markers menu D Beat marker
note: The Detect Beats button creates markers at the major beats in your soundtrack so that you can synchronize clips to
beats.Markers you add to a clip placed in a movie appear only in that instance of the clip. Markers you add to a source
clip appear in each instance of the clip that you subsequently add to the movie. Adding markers to a source clip doesn’t
affect instances of the clip already in a movie.
When you select a clip in the Project Assets panel, the Moni
tor panel displays only the clip markers within the clip.
When you select a clip in the Expert view timeline, it displ
ays only timeline markers. Clip markers appear as icons
within the clip in the Expert view timeline. However, timeline markers appear in the time ruler.