
Operation Manual


77
Arranging movie clips
Last updated 10/4/2016
Move a clip in the Expert view timeline
You can easily rearrange clips in the Expert view timeline by dragging. By using the same techniques you use to add a
clip, you can choose to insert or overlay clips when you move them.
• To move a clip and insert it so all tracks shift after insertion, drag the clip to the desired location. When the pointer
changes to the Insert icon, release the mouse button.
• To move a clip and overlay another clip in the movie, drag the clip to the first frame you want to overlay, and then
p
ress Ctrl/Cmd. When the pointer changes to the Overlay icon, release the mouse butto
n.
• To move only one clip of a linked pair, Alt-select the clip you want to move. Drag it to the desired location. If you
want to shift clips only on the target tracks, release the mouse button when the pointer changes to the Insert icon. If
you want to overlay another clip, press the Ctrl key, and when the pointer changes to the Overlay icon, release the
mouse.
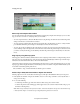
Align clips by using the Snap option
The Snap option, which is enabled by default, makes it easier to align clips with each other or with particular points in
time. You can move a clip with the Snap option selected. The clip automatically aligns with the edge of another clip, a
marker, the start and end of the time ruler, or the current-time indicator.
Snapping also helps ensure that you don’t inadvertently perform an insert or overlay edit when dragging. As you drag
cli
ps, a pop-up window displays the distance, in frames, that you have moved them. A negative number indicates you’ve
moved them toward the beginning of the movie.
Choose Timeline > Snap. A check mark indicates that the option is enabled.
Delete a clip in the Quick view timeline or Expert view timeline
Deleting a clip from a movie doesn’t delete it from the project. The clip is still available in the Project Assets panel.
1 In the Quick view timeline or Expert view timeline, select one or more clips. (Alt-click to select only the audio or
video portion of a clip.)
2 Do one of the following:
• To delete clips and leave a gap of the same duration, called clearing, choose Edit > Delete.
• To delete a clip and close the resulting gap, called a ripple deletion, choose Edit > Delete And Close Gap, or press
the Delete or Backspace key.
Note: Whe
n a clip is deleted from the Quick view timeline, a transiti
on that follows the clip is also deleted. When a clip
is deleted from the Expert view timeline, the preceding and following transitions are deleted.