
Operation Manual

74
Arranging movie clips
Last updated 10/4/2016
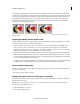
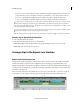
Tracks in the Expert view timeline
Tracks let you layer video or audio and add compositing effects, picture-in-picture effects, overlay titles, soundtracks,
and more. With multiple audio tracks, you can add a narration to one track and background music to another track.
The final movie combines all the video and audio tracks.
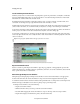
By default, the Expert view timeline contains three tracks for video (or images) and audio, a narration track, and a
s
ound track. You can drag linked clips (clips that include both audio and video) to a track.
For linked clips, the video and audio components appear together (video directly above audio) in their respective tracks
(s
uch as Video1 and Audio1). To see all of the tracks, you may have to scroll up or down the Expert view timeline.
A new track is inserted if you drag and release a clip above the topmost video track. There is no limit to the number of
t
racks a project can contain. You can add or delete tracks at any time, even before adding clips.
A movie must contain at least one of each type of track (the track can be empty). The video track order is important
b
ecause any clip located in Video 2 also overlays the Video 1 track. Audio tracks are combined in playback so the track
order is not relevant.
Tip : Y
ou can specify the default number and type of tracks in new movies.
A Video 2 track B Audio 2 track C Video1 track D Audio 1 track E Narration track F Soundtrack
Expert view timeline tools
Use the tools at the top of the Expert view timeline to play a clip, stop playback, or change playback speed. Use the
panels in the Action bar to add titles, transitions, special effects, and music. You can also add markers, detect musical
beats, open the Audio Mixer, or add narration.
Move through the Expert view timeline
When placing and arranging clips in the Expert view timeline, move the current-time indicator to the appropriate
location. In the time ruler, the current-time indicator corresponds to the frame displayed in the Monitor panel.
A vertical line extends from this current-time indicator through all the tracks. Zooming in and out of the Expert view
timeline can help you identify the exact location for placing a clip or performing an edit.
In the Expert view timeline, do any of the following:
• Drag the current-time indicator.
• Click the time ruler where you want to position the current-time indicator.
• Press Shift while dragging the current-time indicator to snap it to the edge of the closest clip or marker.
• Drag the time display (below the Monitor panel) to the desired time value.