
Operation Manual

71
Chapter 5: Arranging movie clips
Arranging clips in the Quick view timeline
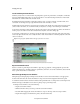
Quick view timeline overview
The Quick view timeline provides a stage on which you can quickly arrange your clips into a movie. It displays each clip
as a series of frames that span the entire clip length. Move the slider to the right to zoom out and see your entire video.
Move the slider to the left to zoom in and see a clip in more detail. The Quick view timeline has the following tracks:
• Title: Add a title for your clip on this track
• Video: Edit your video on this track
• Sound: Place background music and other sounds
• Narration: Add a narration for your clip to this track
Use the Quick view timeline to quickly assemble your clips into a movie. Click the scissor icon on the current-time
in
dicator to split a clip and remove an unwanted portion. You can also use the panels in the Action bar to add titles,
transitions, special effects, and music to your clips.
Adding clips in the Quick view timeline
Drag clips directly to the Quick view timeline from Windows Explorer (Finder in Mac OS). You can also use the Add
Media panel to add clips to the Quick view timeline from various sources.
After adding clips, use the Quick view timeline to rearrange them. You can insert a clip before another, after another,
o
r even split it before inserting.
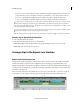
Place a clip in the Quick view timeline
1 Drag a clip from Windows Explorer (Finder in Mac OS) to the Quick view timeline. When you drag the clip over
the Quick view timeline, a vertical green line indicates the drop zone where you can place the clip. When the pointer
changes to the insert icon, release the mouse button.
2 Drag
the clip from Windows Explorer (Finder in Mac OS) to the Monitor panel. The clip is automatically placed in
the Quick view timeline.
Insert a clip before another in the Quick view timeline
Drag the clip from Windows Explorer (Finder in Mac OS) on to a clip in the Quick view timeline.
Last updated 10/4/2016