
Operation Manual


62
Importing and adding media
Last updated 10/4/2016
You generate Specialty clips by using panel options in the Project Assets panel. They reside in the Project Assets panel
along with your added clips.
You can create universal counting leaders, color bars, a 1-kHz tone, black video, and colored backgrounds for your
p
roject. Use Specialty clips for calibration of your video or simply as footage.
Add color bars and a 1-kHz tone
You use the color bars and 1-kHz tone clips in tandem at the beginning of a video. Color bars are multicolored vertical
bars at the beginning of broadcast videos that help broadcasters calibrate the color for a video.
The 1-kHz tone is a short tone (1-kHz frequency) that broadcasters use to adjust audio levels. Broadcasters set it at a
s
pecific level for reference, and then decrease or increase their audio levels to match this frequency. Because some audio
workflows are calibrated at a specific tone level, you can customize the tone level to match your audio workflow.
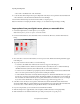
1 Click Project Assets.
2 In the Project Assets panel, click New Item from the panel options and choose Bars And Tone.
A Bars And Tone clip is placed in the Project A
ssets panel and in the Expert view timeline.
Create and add a black video clip
You add black video clips to separate multiple movies or to create pauses in a movie. You can also use a black video clip
for a title.
1 Click Project Assets.
2 In the Project Assets panel, click New Item from the panel options and choose Black Video.
Create a colored matte for a background
You can create a clip consisting of a full-frame matte of solid color, which you can use as a solid background for titles
or animated clips.
Brightly colored mattes can serve as temporary backgrounds to help you see transparency more clearly while you adjust
a key effect.
1 Click Project Assets.
2 In the Project Assets panel, click New Item from the panel options and choose Color Matte.
3 Choose a color in the Adobe Color Picker dialog box, and click OK.
A color matte clip is placed into both the Project Assets panel and the Expert view timeline.
Change the tone level of clips
1 Select a clip using one of the following methods:
• To set the level for all new clip instances, click New Item from the panel options in the Project Assets panel. Then,
select the Bars And Tone option.
• To set the level for only one clip instance, select the clip in the Expert view timeline.
2 Choose Clip > Audio Options > Audio Gain.
3 In the Clip Gain dialog box, do one of the following, and click OK:
• Drag the value control left to decrease, or right to increase, volume.