
Operation Manual


58
Importing and adding media
Last updated 10/4/2016
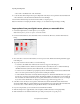
• To specify a different location, click Browse (Windows)/Choose (Mac OS) and choose a folder. Alternatively,
click Make New Folder (Windows)/New Folder(Mac OS) to create and name a new folder.
7 Select a naming convention for the downloaded files using the Presets menu.
Filename Retains the filenames the camcorder assigns.
Folder Name - Number If your folder name is Wedding Pics, the clips are assigned the names Wedding Pics-001,
Wedding Pics-002, and so on.
Date - filename Adds a timestamp to the filename the camcorder assigns. The timestamp is the current date and
time - the date and time on which the movies were transferred to your computer.note: To rename files, delete them
from the Project Assets panel in the Expert view, and reimport them.
Custom Name - Number Enter a custom name in the Name field. For example, if you enter My Holiday in the field,
the clips are named My Holiday-001, My Holiday-002, and so on.
8 (Optional) If you want to delete the selected files in the camera after import, select the option After Copying Delete
Originals.
9 (Optional) If you do not want the imported clips added to the Quick view/Expert view timeline after import,
deselect Add To Timeline. The imported clips are added only to the Project panel.
10 (Optional) If you want to create an InstantMovie using the selected clips, select Create InstantMovie.
11 Click Get Media. You can click Cancel in the Progress dialog box at any time to stop the process.
Note: I
f you don’t intend to use all the files you add, you can delete them from the Project Assets panel. Deleting files from
the panel doesn’t delete them from your hard drive. This practice is recommended for large VOB files.
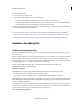
Capture video from webcams and WDM devices
Devices such as webcams and WDM devices capture live video.
Using the Capture window, you capture live video from these devices and copy the video clips to the hard drive location
y
ou specify. You also have the option to capture the clips directly to the timeline by selecting Capture to Timeline check
box
You can add these clips to Adobe Premiere Elements by
dragging them from Windows Explorer to the Quick
view/Expert view timeline.
You can also drag the clips to the Project Assets panel in the Expert view.
Alternatively, use the File And Folders option in the Add Media panel to add the clips to the Quick view/Expert view
tim
eline.
1 Do one of the following:
• Turn on the webcam to capture live footage
• Connect the WDM device to your computer using the FireWire (IEEE 1394) port.
Note: I
nstall any drivers your device requires. Consult the manual.
2 Click Add Media. You also have the option to capture the clips directly to timeline by selecting the Capture to
Timeline check box.
3 From the Add Media panel, select Webcam Or WDM. The Capture window appears.
4 In the Capturing Source menu, select the device from which you want to capture video clips. The video that the
device captures is displayed in the panel below the Capturing Source menu.
Note: Y
ou can extract frames using full motion from the integrated camera's webcam feed.