
Operation Manual

48
Creating a video project
Last updated 10/4/2016
• To change the quality of the playback, right-click/ctrl-click inside the monitor panel. Select Playback Quality >
H
ighest. The CPU usage and RAM consumption of your computer increases when you change the setting to
Highest.
• To pause the preview, click the Pause button, or press the spacebar.
• To control the speed of the preview, drag the shuttle slider to the right. The clip plays faster the further you drag
the shuttle slider.
• To play in reverse, drag the shuttle slider to the left. The clip rewinds faster the further you drag the shuttle slider.
• To go forward one frame, click the Frame Forward button. To go forward five frames, Shift-click the Frame
Forward button.
• To go backward one frame, click the Frame Back button. To go backward five frames, Shift-click the Frame Back
button.
• To jump to a different frame, click the current-time display, and type the new time. (Colons or semicolons aren’t
required. However, Adobe Premiere Elements interprets numbers under 100 as frames.)
• To go to the end of the previous clip (the cut or edit point), click the Go To Previous Edit Point button.
• To go to the beginning of the next clip, click the Go To Next Edit Point button.
Scroll the Expert view timeline during preview
You can set an option to automatically scroll the Expert view timeline from right to left, when a sequence is larger than
the visible timeline. This way you don’t have to zoom out to see the entire sequence.
1 On Windows®, select Edit > Preferences > General. On Mac® OS, select Adobe Premiere Elements 13 > Preferences
> G
eneral.
2 Choose an option from the Timeline Playback Auto-Scrolling menu.
No Scroll Doesn’t scroll the Expert view timeline.
Page Scroll Scrolls the visible section of the Expert view timeline one page at a time.
Smooth Scroll Scrolls the Expert view timeline while the current-time indicator stays in the center of the visible
timeline.
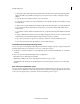
View safe zones in the Monitor panel
You can view safe zone margins (guides) in the Monitor panel to determine if any text or objects in your project fall
outside the safe zone. When text or objects fall outside the safe zone, they may be clipped when played back on certain
screens. Safe zone margins are for your reference and are not included in previews or export.