
Operation Manual


45
Creating a video project
Last updated 10/4/2016
Maximizing scratch disk performance
• If your computer has only one hard disk, consider leaving all scratch disk options at their default settings.
• If it has more than one, choose large, secondary hard drives for scratch disks and not the main load drive. In
Premiere Elements, you can place each type of scratch file onto its own disk. For example, you copy video to one
disk and audio to another.
• Defragment scratch disks regularly by using the disk defragmenting tool available on your computer or use a
third-party utility.
• Specify your fastest hard disks for capturing media and storing scratch files. You can use a slower disk for audio
preview files and the project file.
• Specify only disks attached to your computer. The throughput from a hard disk on a network is too slow. Avoid using
removable media as scratch disks because Adobe Premiere Elements always requires access to scratch disk fi
les.
Scratch disk files are preserved for each project, even when you close the project. Adobe Premiere Elements reuses
these files when you reopen the project associated with them. If scratch disk files are stored on removable media and
the media is removed from the drive, the scratch disk is not available to Premiere Elements.
• You can divide a single disk into partitions and set up each partition as a virtual scratch disk. However, partitioning
doesn’t improve performance because the single drive mechanism is a bottleneck. For best results, set up scratch disk
volumes on actual separate drives.
Viewing clip properties
See an overview of basic clip properties
To view the basic properties of a clip, right-click/ctrl-click the clip in the Project Assets panel, choose Properties.
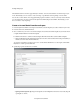
View comprehensive file information
Adobe Premiere Elements includes tools that you can use to evaluate a file in any supported format stored inside or
outside a project. For example, you can determine whether a clip you exported has an appropriate data rate for Internet
distribution. Video file properties can include file size, number of video and audio tracks, duration, average frame rate,
audio sample rate, video data rate, and compression settings. In addition, they include information about dropped
frames in captured clips.
Use the Get Properties feature to check for dropped frames in a clip you captured. Use the Data Rate Analysis graphs
t
o evaluate how well the output data rate matches the requirements of your delivery medium. The graphs depict the
render keyframe rate, the difference between compression keyframes and differenced frames (frames that exist between
keyframes). They also depict the data rate levels at each frame.
Do one of the following:
• If the clip is in the Expert view timeline, select it and choose File > Get Properties For > Selection.
• If the clip is not in the project, choose File > Get Properties For > File. Locate the clip you want to analyze and
t
hen click Open.