
Operation Manual


40
Last updated 10/4/2016
Creating a video project
Find an item in a project
Right-click an item in the Expert view timeline, and select Reveal In Project.
To find an item on the hard drive, right-click the clip, choose Properties, and note the path at the top of the
Properties panel.
Locate missing files for a project
Premiere Elements doesn’t store original source files in a project—it references the name and location of each source
file when you import it. If you later move, rename, or delete a source file from your computer, the Where Is The File
dialog box opens when you next open the project.
In addition to source files, a project also references preview files. Preview files allow you to preview effects in real time
without having to render them—a process that can take hours. Preview files can be re-created if necessary.
Note: After you create the final movie, you can delete source files if you do not plan to reuse them. If you plan to re-edit the
movie in the future, archive the project with the Project Archiver before deleting source files.
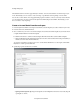
In the Where Is The File dialog box, choose one of the following options:
Display Only Exact Name Matches Displays only the files that match the name of the missing file when the project
was last closed. If you know that the name of a file has changed, deselect this option.
Select Replaces the missing file with the original or replacement file.
Find Starts the Windows XP Search feature.
Skip Previews Ignores missing preview files so you aren’t asked to find them.
Skip Replaces the missing file with an offline file. The offline file acts as a placeholder for related clips in the Project
Assets panel and the Expert view timeline.
Skip All Replaces all missing clips with offline files without asking you for confirmation.
Delete a clip
Because Adobe Premiere Elements doesn’t store media files in the project, deleting a clip from a project removes all
instances from a movie. However, Adobe Premiere Elements does not delete the clip’s source file from your computer.
To conserve disk space, delete the source file.
To delete a media file from the Project workspace, do one of the following:
• Select the file in the panel and click the Delete icon.
• Right-click/ctrl-click it in the Expert view timeline, and choose Delete. You can also delete by selecting the file and
p
ressing the Delete key. The file is deleted from the Elements Organizer, but it is not deleted from your hard disk.
Tip : T
o identify unused items in a project, see the Video Usage and Audio Usage columns in List view. To display
these columns, scroll to the right. A green check mark (list view) and a green dot (grid view) indicates that the asset
i
s being used in the project.
Undoing changes