
Operation Manual


30
Creating a video project
Last updated 10/4/2016
• Click Exit to quit the Video Story workflow and return to the application workspace.
Note: C
lose and relaunch the application if you want to view the tips again.
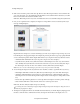
3 Choose a category to start creating the video story. Click General to create the video story with a general theme. If
the theme is not present on the computer, you will see an Online Content Download that displays content being
downloaded for that theme.
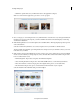
4 Click the left/right buttons to browse through the various available themes. The image displayed provides a preview
of the selected theme.
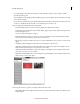
Select Use media from my timeline to access videos and photos from your timeline or click Get Started.
The Use media from my timeline option brings all the videos and photos from your timeline to the story asset view
in
the Video Story workflow.
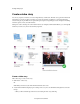
5 Click a media source from the available import options to import story assets to include in your story. The available
media sources from which you can import photos, videos, and audio files are listed below. Click to import media
from one of these media sources:
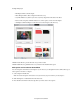
• Elements Organizer: Import videos and photos from Elements Organizer.
• Videos from Flip Or Cameras: Import videos from FLIP, AVCHD cameras, or other memory/disk devices.
• Photos From Cameras or Devices: Import photos from digital cameras, phones, or removable drives.
• Files And Folders: Import videos, photos, and audio files from the hard drive of your computer.
Select the media from the Add Media dialog box and click Open.