
Operation Manual

253
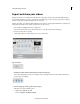
Saving and sharing your movies
Last updated 10/4/2016
Disc
Select a specific media format from the Disc category. The options available to you are DVD, Blu-ray, and AVCHD.
Depending on the complexity and length of the project and your computer speed, encoding (compressing) video and
au
dio for a disc can take hours. If you plan to burn multiple discs with the same content and quality, you can save time
by burning them in the same session, which compresses the project only once.
Note: P
remiere Elements converts all audio to the 16-bit depth and 48 kHz sample rate required by DVDs. For the best
results, record your audio using these settings.
Before you begin burning to a DVD or a Blu-ray disc:
• Ensure that the disc you’ve selected is compatible with both your burner and the player.
• Check available disk space. You must have enough available hard disk space to accommodate the compressed files
as well as any scratch disk files created during export.
• If your DVD burner is not compatible with Adobe Premiere Elements, you can create an ISO image and then burn
the image to a DVD using the software that came with your burner. Specify your option in the Type drop-down list.
If you don’t have enough free disk space on one drive partition, you can specify a different partition for the scratch disk
f
iles using the Edit > Preferences > Scratch Disks / Adobe Premiere Elements > Preferences > Scratch Disks command.
(You can verify the space needed in the Burn dialog box.)
When a disc burn operation is unsuccessful due to a hardware failure, Premiere Elements creates and saves an ISO
image. You can then burn the ISO image to a disc, at a convenient time.
See disc burning guidelines for tips on burning discs.
Online
Premiere Elements enables you to export your movie in formats suitable for delivery through the Internet. Using the
E
xport & Share panel, you can upload your video directly to the web.
Select an online sharing platform from the Online category. The options available to you are Facebook, Vimeo, and
Y
ouTube.
Using the recommended settings is the quickest way to export your movie. You can also customize the settings to match
a s
pecific situation. Remember, however, to make sure that the data rate of your movie is appropriate for the intended
playback medium.
Clicking Begin Share initiates the authorization process after which you can continue with the sharing workflow of the
se
lected platform.
Audio
You can choose to export only audio from your movie using the Export & Share > Audio command.
When you choose this option, Adobe Premiere Elements facili
tates saving it as Windows Waveform file (.wav), MP3
file (.mp3), AAC file (.aac) or AIFF file (.aiff). Adjust the quality to suit your requirements.
Image