
Operation Manual


245
Last updated 10/4/2016
Creating disc menus
Note: Although an auto-play disc does not contain menus that link to the marker, existing menu and scene markers in the
project can be useful. The Next and Previous buttons on a DVD or Blu-ray player’s remote control skip ahead or back to
main menu markers and scene markers. Stop markers are ignored.
In the Adjust panel, click Auto-Play.
The men
us are removed from the Adjust panel and the markers are as chapter points in an auto-play disc.
More Help topics
Preview Disc panel overview
Disc burning guidelines and compatibility
Add menu, scene, or stop markers manually
Previewing menus
Preview Disc panel overview
It’s always a good idea to preview a disc before you burn it. The Preview Disc panel contains controls that mimic those on
a DVD or Blu-ray player’s remote control. By using these controls, you can test each button on the menus and view
the video to which they link. You can preview a disc in a window or full-screen.
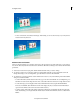
Preview a menu-based DVD or Blu-ray Disc
You can preview a menu-based disc at any point after dragging a template onto the Disc Layout panel.
1 Click Tools on the Action bar and choose Movie Menu from the Tools panel, if necessary, to open the Disc Layout
panel.
2 In the Movie Menu panel, click Preview.
Note: If you are notified that buttons overlap, see Change the placement and size of menu items.
3 In the Preview Disc window, use the navigation controls or your mouse to click each button and view each scene
or
video. If the menu or button thumbnails have video or audio, those clips play so that you can preview them before
burning a disc.
4 Click the Play Full Screen icon to preview the disc in full screen.
5 Move the mouse. This opens a Disc control panel you can use, while in full-screen mode, to emulate the remote
control for a disc player.
More Help topics
Preview a movie in the Monitor panel