
Operation Manual


242
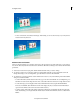
Creating disc menus
Last updated 10/4/2016
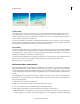
2 Click Download Now to download selected template. Click Download All to download all Menu templates.
3 Click the Download in background button to download the contents in background as you continue to work in
Adobe Premiere Elements.
Note: The B
lue bar on top right corner on the content indicates the content is not downloaded. Internet access is required
to download contents.
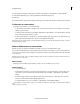
Customize a menu template
You can customize the background image, buttons, menu names, and typography for any menu template.
Customize a menu background
You can personalize your menu background with video clips, video clips with audio, an audio clip, still images, or still
images with audio.
Some menus have special drop zones where you can place videos or still images. Templates with drop zones contain a
b
lack drop area and an “Add Your Media Here” message. You can place videos and still images even if the menu
does not have a drop zone. In this scenario, the media replaces the entire background. Some menus without drop zones
h
ave additional art that remains in front of your video.
1 In the Disc Menu panel, click the thumbnail of the menu you want to change.
2 In the Menu panel, click Browse, and then locate and select a clip on your hard drive.
Note: W
hen both video and audio are set and you replace one of the clips, the other clip remains set, unless you select
background video that also contains audio. In that case, the background audio overrides the existing audio.
3 Specify settings in Properties view (Menu Background panel) of the Tasks panel:
Reset Sets the background to the original template background.
In Point Sets the In point of the video or audio clip. Drag the timecode to the desired frame.
Play Plays media in the thumbnail. The icon changes from the Play button to the Pause button. Click the Pause
button to stop the playback and set the In point of the background.
Use Still Frame Sets the current frame in the video clip as a still background image. Drag the timecode to set the
frame.
Apply Default Transition Before Loop Adds the transition you’ve set as the default each time the video starts from
the beginning.
Duration Sets the duration of background video or audio from the In points.
Apply To All Menus Applies the background to all disc menus.
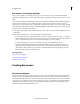
Change the placement and size of menu items
1 At the bottom of the Disc Layout panel, click the thumbnail of the menu you want to change.
2 Do any of the following:
• To resize a menu item, select it in the Disc Layout panel. A rectangle (called a bounding box) with eight selection
points appears around the item. Drag any selection point to resize the item. Alternatively, in Roman language
versions, you can use the – (minus) or = (equal) keys on your keyboard to resize the item proportionately in all
directions. The equal key enlarges the item.