
Operation Manual


238
Creating disc menus
Last updated 10/4/2016
Every _ Minutes Places scene markers at the interval you specify. (This option is only available when the movie
contains several minutes of footage.)
Total Markers Spaces the number of markers you specify evenly across the entire range of clips in the Expert view
timeline.
5 If the Expert view timeline contains existing markers that you no longer want, select Clear Existing Menu Markers.
(When you clear the markers, you clear the marker names and thumbnail offsets associated with each one.)
6 Click Continue. Scene markers are added to the Expert view timeline, underneath the time ruler. If necessary, use
the options in the Adjust panel to modify the properties of the menu.
7 If you don’t like the placement of a marker, drag it in the time ruler to a different location.
Note: S
cene markers are not tied to the video. If you later edit the video, you may need to move the markers or regenerate
them so that they match the new edit points.
Add menu, scene, or stop markers manually
When you manually add markers, you can name them as you place them. The name you choose appears as the label for
a button in the main menu or scenes menu.
On some templates, the menu buttons include thumbnail images of the video to which they are linked. If the default
f
rame does not represent the best frame for a button, you can change it in the Menu Marker dialog box.
Add a main menu marker or scene marker
1 In the Expert view timeline, move the current-time indicator to the location where you want to set the marker.
Note: T
he Play button on each main menu template automatically links to the start point of the time ruler. You don’t
have to place a marker there unless you want it listed in the scenes menu.
2 In the Quick view timeline or the Expert view timeline, select Markers > Menu Marker > Set Menu Marker.
To quickly place a marker, you can also drag a marker from the Add Menu Marker button to the desired location in
the time ruler.
3 In the Menu Marker dialog box, type a name for the marker in the box. Text in this box doesn’t wrap, so to place text
on multiple lines, press Ctrl+Enter for each new line. Keep the name of the marker short so that it fits in the menu
and doesn’t overlap another button. (You can adjust the name later, after you select a template.)
4 In the Marker Type menu, select the type of marker you want to set.
5 Do one of the following to set the appearance of the button thumbnail:
• To select a still image for the button thumbnail in the menu, drag the Thumbnail Offset timecode to the frame
with the image you want. Do not select the Motion Menu Button option. When you create the DVD, or Blu-ra
y
D
isc, the image appears in the menu. (This thumbnail is for the menu display only. When you click the button
on the disc, the video starts playing at the marker location.)
• To play video in the disc’s menu button, select Motion Menu Button. When you select this option for a main
men
u marker or scene marker, the corresponding button in the menu becomes animated.
6 Click OK.
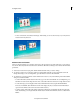
The marker is added to the Expert view timeline, below the time ruler. A main menu marker is blue, a scene marker is
g
reen, and a stop marker is red.
Add a stop marker
1 In the Expert view timeline, move the current-time indicator to the end of the video or scene.