
Operation Manual


234
Mixing audio
Last updated 10/4/2016
4 Drag up or down to adjust the level uniformly. Drag any existing keyframes to move them.
As you drag, the decibel level is displayed. A positive number indicates an increase in volume; a negative number
in
dicates a decrease.
Adjust the input level of clips
If the original volume of the clip is too high or low, change the input level, or gain, before adjusting to the output levels.
However, if the level of source audio was set too low when it was recorded, increasing the gain amplifies noise. For best
results, record audio at a high volume level that is not so high as to cause distortion. Without adjustment, well-recorded
audio peaks between 0 dB and -6 dB in the Audio Meters panel. Recording audio above 0-dB results in clipping.
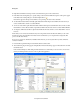
1 In the Expert view timeline, select the clip. To work with multiple clips, do one of the following:
• To select non-consecutive clips, Ctrl-click/Cmd-click each clip.
• To select consecutive clips, click in the Project Assets panel and drag a marquee around the selected clips.
• To select all the clips, press Ctrl-A/Cmd-A.
2 Select Clip > Audio Options > Audio Gain.
3 Do one of the following:
• Click the zero value and type gain value (0 dB equals the clip’s original gain).
• Click Normalize to automatically boost gain where it’s too quiet or reduce gain where it’s too loud. Premiere
Elements displays the amount required to reach maximum gain without clipping.
Mute a clip
1 Do one of the following in the Expert view timeline:
• If the clip is linked to video, Alt-click the audio track of the clip in the Expert view timeline to select just the audio
portion.
• If the clip is not linked to video, click the clip to select it.
2 Choose Clip > Enable. (When you disable a clip, the check mark disappears next to the option in the clip menu, and
the clip name dims in the track.)
More Help topics
Resize tracks