
Operation Manual


232
Mixing audio
Last updated 10/4/2016
About audio mixing
Mixing audio involves adjusting volume levels so that they maintain a good range within each clip, and then adjusting
them in proportion to other clips used in the movie. For example, you might first adjust the volume of a narration clip
so that there is little variance between its softest and loudest sections; then raise the narration’s overall volume so that
it is clearly audible over background sounds or music included in other clips.
In Premiere Elements, volume changes are measured in decibels. A level of 0.0 dB is the original volume (not silence).
C
hanging the level to a negative number reduces the volume, and changing the level to a positive number increases the
volume.
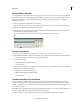
To control a clip’s volume, you can use the Volume graph—the yellow line running horizontally across the audio track
o
f each clip (sometimes referred to as the volume rubberband)—or the Audio Mixer. You can use the Audio Meters
window to view the overall audio volume for your project.
Consider the following guidelines when adjusting volume levels:
• If you combine particularly loud audio clips on multiple tracks, clipping (a staccato distortion) may occur. To avoid
clipping, reduce volume levels.
• If you need to adjust the volume separately in different parts of a clip (for example, one person’s voice is faint, while
later another’s is too loud), you can use keyframes to vary the volume throughout the clip.
• If the original level of a clip is much too high or low, you can change the input level. However, adjusting the input
le
vel will not remove any distortion that may have resulted from recording the clip too high. In those cases, it is best
to re-record the clip.
Adjust volume and mix audio in the Audio Mixer
Use the Audio Mixer to adjust audio balance and volume for different tracks in your project. You can adjust the balance
and level of audio contained within your video clips, and within soundtrack and narration audio. For example, you may
want to increase the volume of the narration and decrease the volume of the soundtrack at different points for emphasis
or so that quiet voices can be heard above the music.
You can adjust settings while listening to audio tracks and viewing video tracks. Each track in the Audio Mixer
co
rresponds to an audio track in the Expert view timeline, and is named accordingly. As you make adjustments,
keyframes are added to the track. You can specify a default minimum interval for keyframes in the Audio preferences.
Ideally, you should mix the volume for one track from beginning to end before moving on to the next track. Same for
mixing balance.
1 (Optional) Choose Edit > Preferences > Audio / Adobe Premiere Elements 13 > Preferences > Audio, and set a value
between 1 and 2000 milliseconds for Minimum Time Interval Thinning to limit keyframes to intervals larger than
that value. If you don’t want to hear audio while you scrub audio, deselect Play Audio While Scrubbing.
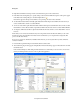
2 In the Expert view timeline, click the Tools panel and select Audio Mixer option or choose Tools > Audio Mixer.
Note: T
o hide or display tracks, choose Show/Hide Tracks from the Audio Mixer panel menu; then specify which tracks
you want displayed.
3 Drag the current-time indicator to where you want to start mixing audio.
4 Click Play in the Monitor window and adjust the controls in the Audio mixer to automatically add keyframes to the
track:
• To adjust balance for a track, turn (drag) the Balance control left or right.
• To increase the volume for a track, drag the Level control up or down.
note:
You can specify the spacing of keyframes in the Audio preferences.