
Operation Manual

213
Creating titles
Last updated 10/4/2016
This Guided Edit is a tutorial on adding narration to your video clip. To add narration to your video clips using this
Guided edit, follow these steps:
1 This Guided Edit is a walkthrough on adding narration to your video clips.
Click Back and Next to move forward or backward in the guided edit's steps.
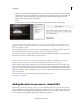
2 Click Add media to import the video clip you add scores to. Ignore if the video clip is already present on the timeline.
3 Select the option to import media.
4 Select Guided > Adding Narration to your movie
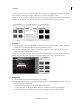
5 Attach a microphone (input source) to add narration to your movie, click next.
6 Select the Default Device.
In the Audio Hardware section of preferences, click ASIO Settings. Select the input tab and choose your input
device.
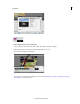
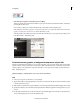
7 To add narration to your movie, move the CTI to the point where you want the narration to begin. Open the Tools
panel from the action bar. Choose Narration.
8 Press Record to start the recording. Adjust the Mic Sensitivity by moving the slider. Press Stop to stop recording.
Click Done to finish adding narration.
Exporting and importing titles
Export a title file
You can export a title from Premiere Elements to a file for use in another Premiere Elements project.
1 In the Expert view, click Project Assets to open the Project Assets panel.
2 Select the title you want to export as a separate file.
3 Choose File > Export > Title.
4 Specify the name and location for the saved title file, and click Save.
Import a title file
You can import a title into a project that was exported from another Premiere Elements project.
1 In the Expert view, click Project Assets to open the Project Assets panel.
2 Right-click/Ctrl-click on the Project Assets panel and select Get Media From > Files And Folders.