
Operation Manual

206
Creating titles
Last updated 10/4/2016
Set the fill
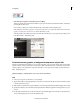
You can use the Color Properties dialog box to set an object’s fill. An object’s fill property defines the area within the
contours of the object. The property defines the space inside a graphic object or within the outline of each character of
a text object.
Note: The F
ill box in the Color Properties dialog box is enabled only if you‘ve applied a preset style from the Style tab in the
Adjust panel to the object. These styles contain fills and strokes, which you can edit.
1 If necessary, double-click the title in the Expert view timeline to open it in the Monitor panel.
2 Select an object that contains a fill. (If necessary, click a style in the Style tab of the Adjust panel to apply it to the
object.)
Note: A
ll preset styles in Title Styles contain a fill except the one in the upper-left corner of the panel.
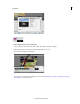
3 In the Text tab of the Adjust panel, click the Color Properties button.
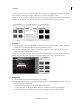
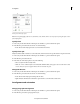
4 In the Color Properties dialog box, select the Fill box.
5 From the Gradient menu, select a gradient type for your fill.
Note: I
f you select Linear Gradient, Radial Gradient, or 4-Color Gradient, color stop controls appear. You can click each
stop and select a separate color for each.
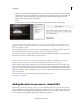
6 Do any of the following to set the color:
• To make the fill transparent, click the No Color box.
• To set the color to 100% white, click the white box.
• To set the color to 100% black, click the black box.
• To set the hue, click the color you want in the rectangular color spectrum, and then specify the exact color by
clicking in the color picker above the spectrum.
• To set the color numerically, set the R, G, and B values by dragging the value or clicking and entering a number.
Set the stroke
You use the Color Properties dialog box to set an object’s stroke, or outline if you’ve applied a style containing a stroke.
Note: T
he Stroke box in the Color Properties dialog box is enabled only if you‘ve applied a preset style from the Style tab in
the Adjust panel to the object.
1 If necessary, double-click the title in the Expert view timeline to open it in the Monitor panel.
2 Select an object that contains a stroke. (If necessary, click a style in the Adjust panel.)
Note: A
ll preset styles in Styles contain a stroke except the one in the upper-left corner of the panel.
3 In the Adjust panel, click the Color Properties button or right-click/ctrl-click the object and choose Color
Properties.
4 Select the Stroke box.
5 From the Stroke menu, select the stroke you want to use. (Not all strokes have multiple Stroke options.)
6 For Stroke Weight, specify the stroke’s thickness, in pixels.
7 From the Gradient menu, select a gradient type for your fill.
Note: I
f you select Linear Gradient, Radial Gradient, or 4-Color Gradient, color stop controls appear. You can click each
stop and select a separate color for each.