
Operation Manual


178
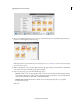
Applying transitions and special effects
Last updated 10/4/2016
5 Locate and select the image file you want to use in the transition, and click Open. The image appears in the Gradient
Wipe Settings dialog box.
6 Adjust the softness of the transition’s edges by dragging the Softness slider. As you drag the slider to the right, the
first clip increasingly shows through the second clip. Click OK.
7 Adjust the properties of the transition, if necessary, using the Transitions contextual control and click Done.
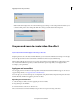
Change the image for a Gradient Wipe transition
1 Double-click the transition in the Expert view timeline. The Transitions contextual control appears.
2 In the Transitions contextual control, click More and then click Custom. The Gradient Wipe Settings dialog box
appears.
3 In the Gradient Wipe Settings dialog box, click Select Image.
4 Locate and select the image file you want to use, click Open, and then click OK.
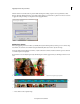
Finding and organizing effects
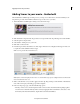
Find an effect
Available effects are listed in the Effects panel. In the Quick view, they are organized into two categories: Video Effects
and Film Looks. The Expert view has numerous other categories and several effects grouped under each category.
For example, the Blur And Sharpen category contains effects that alter the clarity or focus of an image, such as Fast Blur
and
Sharpen.
Click Effects on the Action bar, and
do one of the following in the Effects panel:
• In the search box, type the name of the effect that you are looking for. The list displays all effects with names that
match the letters and spaces you type. (Clear the text box to see all of the effect categories.)
• Choose an effect category (Video, Audio, and so on), and then choose an effect (for example Black and White or
Gaussian Blur).
More Help topics