
Operation Manual


166
Applying transitions and special effects
Last updated 10/4/2016
Note: On Mac OS, the Videomerge dialog is not displayed when you drag a clip with a solid background. To apply
Videomerge on Mac OS, drag the clip to the Monitor panel, and then select the Videomerge option. You can also apply
Videomerge from the Effects panel.
Create transparency with a keying effect
To create transparency wherever a specific color occurs in a clip, apply a color-based keying effect. These effects are
commonly used to remove a colored background.
1 In the Action bar, click Effects to display the Effects panel.
2 Choose a Keying effect (or Chroma, Blue Screen, Green Screen, or Non Red).
3 Drag the effect to a clip in the Quick view timeline or the Expert view timeline.
4 (Optional) Click the Applied Effects button to open the Applied Effects panel, and expand the effect name to view
and edit the effect’s options.
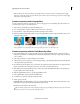
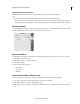
A Upper clip B Blue Screen automatically makes the background transparent C Lower clip D Combined clips
Create transparency with the Track Matte Key effect
1 If you haven’t already done so, add the matte file to the project: Click Add Media and choose Files And Folders.
Navigate to the matte file, and click Open. The matte file should preferably contain only a single shape (for example,
a star or a flower).
2 Add a background clip to a track in the Expert view timeline.
3 Add the clip you want to superimpose over the background clip to any track higher than the background clip. This
is the clip revealed by the track matte.
4 On a third track, add the clip that serves as the matte. (To add a third track, drag the matte to an empty area in the
Expert view timeline above the highest video track. A new track is automatically created.)
5 In the Effects panel, expand the Keying category folder, and drag the Track Matte Key effect to the superimposed
clip (the clip above the background clip).
6 Click the Applied Effects button to open the Applied Effects panel.
7 In the Applied Effects panel, expand the Track Matte Key.
8 For Matte, choose the video track that contains the matte.
9 Adjust options as needed:
Composite Using Select Matte Alpha to composite using the values in the alpha channel of the track matte. Select
Matte Luma to composite using the image’s luminance values instead.
Reverse Inverts the values of the track matte.
Tip : To retain the original colors in the superimposed clip, use a grayscale image for the matte. Any color in the matte
removes the same level of color from the superimposed clip.