
Operation Manual

161
Applying transitions and special effects
Last updated 10/4/2016
The Guided Editing message is displayed. You can collapse/expand info window. Click Next to go to the next step in
the guided edit.
4.
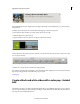
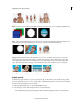
Click Tools from the Action bar and select the Time Remapping tool from the tools panel.
5. Move the CTI to the point where you want to change the speed of your clip.
6.
Click Add TimeZone on the Action bar.
7. Drag the handles on the sides of the zone to adjust your TimeZone selection.
8.
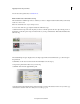
Move the slider to select a play speed. You could choose to either increase the speed or reduce it. Select ease in and
e
ase out options if need be.
9.
Click Done to watch your video with the time remapping effect.
Note: The time remapping effect only applies to the video while the audio will play at the same rate. This means that a
l
arge change in clip speed may result in the audio going out of sync.
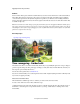
sloMoTop.jpg
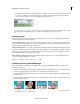
Create a black and white video with a color pop - Guided
Edit
The Guided mode offers a set of built-in Guided Edits, which take you sequentially through a series of steps to help you
perform a specific editing task. This guided approach helps you easily learn Adobe Premiere Elements and turn your
video clips into professionally edited movies.