
Operation Manual

160
Applying transitions and special effects
Last updated 10/4/2016
Volume
Use the Volume effect in place of the Fixed Volume effect if you want to render Volume before other Standard effects.
The Volume effect creates an envelope for a clip so that you can increase the audio level without clipping. Clipping
occurs when the signal exceeds the dynamic range that’s acceptable for your hardware, often resulting in distorted
audio. Positive values indicate an increase in volume; negative values indicate a decrease in volume. The Volume effect
is available for clips only.
Note: Y
ou can make most volume changes by using the fixed Volume effect. You can apply this additional Volume effect if
other
effects (such as Reverb or Bass) overly increase or decrease clip volume. You can also fade the volume of one clip out
while fading the volume of the next up by dragging one of the Crossfade audio transitions from the Effects view of the Task
panel to the cut point between the clips.
More Help topics
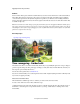
Time remapping - Guided edit
The Guided mode offers a set of built-in Guided Edits, which take you sequentially through a series of steps to help you
perform a specific editing task. This guided approach helps you easily learn Adobe Premiere Elements and turn your
video clips into professionally edited movies.
To learn about other guided edits, see Guided mode .
Note: It is recommended that you use a video clip that is at least 60FPS or higher. Anything lower than 60FPS may result
in y
our video not playing smoothly.
Add a slow or fast motion effect
This Guided Edit is a walkthrough on how to enhance your videos with a slow motion effect.
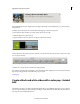
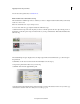
To create a video with a slow motion effect, follow these steps:
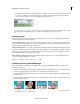
1. Click Add media to import the video clip that you want to work wi
th. Ignore if the video clip is already present on
the timeline. 2. Select the option to import media and choose your clip. 3. Click Guided > Creating a Slow or Fast
Motion Effect.
Superimposing and transparency