
Operation Manual


144
Applying transitions and special effects
Last updated 10/4/2016
Track Matte Key
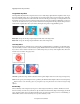
The Track Matte Key reveals one clip (background clip) through another (superimposed clip), using a third file as a
matte that creates transparent areas in the superimposed clip. This effect requires two clips and a matte, each placed on
its own track. White areas in the matte are opaque in the superimposed clip, preventing underlying clips from showing
through. Black areas in the matte are transparent, and gray areas are partially transparent.
You can create mattes in various ways:
• Use the Titles view to create text or shapes (use only grayscale images if you plan to key using luma information),
sa
ve the title, and then import the file as your matte.
• Create a matte from any clip by using the Videomerge effect, Chroma Key, Blue Screen Key, Green Screen Key, or
Non Red Key keying effect; then choose the effect’s Mask Only option.
• Use Adobe Photoshop Elements, Adobe Illustrator, or Adobe Photoshop to create a grayscale image and import it
into Premiere Elements.
The Track Matte Key has the following controls:
Matte Lists the video tracks that contain clips that could be used as mattes. Choose one from the list.
Composite Using Selecting Matte Alpha from this pop-up menu sets the matte’s transparency based on its alpha
channel. Matte Luma sets transparency based on the matte’s luminance or brightness.
Reverse Reverses the order of the background and foreground clips.
NewBlue Art Effects Elements
Airbrush
The Airbrush effect creates an airbrushed effect by smoothing colors while maintaining sharp edges.
Spray Lets you set the width of the airbrush nozzle. Increase the spray value to make the colors blend together over
larger areas. Decrease the spray value to make individual color details become more evident.
NewBlue, Inc., www.newbluefx.com.
Colorize
The Colorize effect turns the image black-and-white, and then enhances specific areas using one or two colors that you
specify. The areas that are enhanced are those that contain one of the two colors you specify. You can specify the two
paint colors that dominate the image, and adjust how much color is applied.
To use only one color, drag the strength value of one color to 0.
Color A and Color B Specify the paint colors that stand out in the image. Use the eyedropper to select point colors
directly from the image, or click the color swatch to choose a color from the Color Picker. Brightness or dullness does
not affect the results; however, the hue is important. For example, you can select a dark green or a light green and the
result will be the same. You can refine the color by clicking the color swatch and adjusting the color in the Color Picker.
Strength A and Strength B Control the influence of the associated paint color. The stronger the paint, the more it is
used to color neighboring hues.
NewBlue, Inc., www.newbluefx.com.