
Operation Manual


141
Applying transitions and special effects
Last updated 10/4/2016
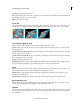
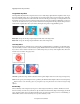
A Original clip B Blue color keyed out C Clip on second track D Final composite clip
Apply the Chroma Key effect to a clip multiple times to key out multiple colors.
Adjust the following Chroma key settings as needed:
Similarity Broadens or reduces the range of color that will be made transparent. Higher values increase the range.
Blend Blends the clip you are keying out with the underlying clip. Higher values blend more of the clip.
Threshold Controls the amount of shadows in the range of color you keyed out. Higher values retain more shadows.
Cutoff Darkens or lightens shadows. Drag to the right to darken shadows, but do not drag beyond the Threshold slider;
doing so inverts gray and transparent pixels.
Smoothing Specifies the amount of anti-aliasing applied to the boundary between transparent and opaque regions.
Anti-aliasing blends pixels to produce softer, smoother edges. Choose None to produce sharp edges with no
anti-aliasing. This option is useful when you want to preserve sharp lines, such as those in titles. Choose Low or High
to produce different amounts of smoothing.
Mask Only Displays only the clip’s alpha channel, as modified by the key settings. If Mask Only is selected, opaque areas
of a clip appear white, transparent areas appear black, and partially transparent areas appear gray. Remove all the gray
areas to produce a clean, hard-edged key.
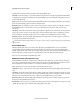
Difference Matte effect
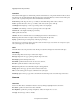
The Difference Matte effect creates transparency by comparing a source clip with a difference clip, and then keying out
pixels in the source image that match both the position and color in the difference image. Typically, it’s used to key out
a static background behind a moving object, which is then placed on a different background. Often the difference clip
is simply a frame of background footage (before the moving object has entered the scene). For this reason, the
Difference Matte effect is best used for scenes that have been shot with a stationary camera and an unmoving
background.
A Original image B Background image C Image on second track D Final composite image
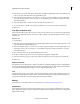
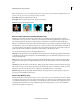
Garbage Matte (Four-Point, Eight-Point, and Sixteen-Point)
Use these effects to apply a garbage matte with either four, eight, or 16 adjustment points for more detailed keying. After
you apply the effect, click the Applied Effects button, and then click the effect name in the Applied Effects panel to
display the garbage matte handles in the Monitor panel. To adjust the matte, drag the handles in the Monitor panel.