
Operation Manual

133
Applying transitions and special effects
Last updated 10/4/2016
AutoTone and Vibrance
The AutoTone effect uses automatic Adobe Premiere Elements settings for exposure, brightness, contrast, blacks, and
whites. You can choose to use the default settings or edit the parameters after applying the effect to a clip.
Note: While AutoTone parameters are applied automatically to each frame, set the Vibrance value manually.
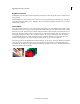
Vibrance prevents over saturation of colors as full saturation values are reached. For example, you can use vibrance to
prevent over saturation of skin tones. The saturation levels of lower-saturated colors are affected more than the higher-
saturated colors.
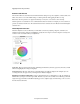
Three-Way Color Corrector
The Three-Way Color Corrector effect lets you make subtle corrections by adjusting a clip’s hue, saturation, and
brightness for the shadows, midtones, and highlights. Specify the color range for correction using the secondary color
correction controls to further refine your adjustments.
Tonal range When you preview an image using Tonal Range, the black areas (shadows), gray areas (mid tones), and the
white areas (highlights) in an image are displayed.
Preview impact area The areas in the image to which the changes are applied is displayed. For example, if you are
correcting mid tones, the gray areas in your image that are affected is displayed.
Black Balance, Gray Balance, White Balance Assigns a black, midtone gray, or white balance to a clip. For example, for
White Balance, you target a color that is pure white. The three-way color corrector shifts colors in the image so that the
targeted color appears white. Use the different Eyedropper tools to sample a target color in the image, or choose a color
from the Adobe Color Picker.