
Operation Manual

99
Editing clips
Last updated 10/4/2016
Change a clip’s speed
To create a fast- or slow-motion effect, change clip speed. Changing clip speed changes the clip’s duration. Speeding up
a clip removes frames, thus shortening the clip duration. In the same way, slowing down a clip repeats frames and thus
adds to the length of a clip. For audio clips, a change in speed also changes pitch. The Time Stretch command includes
an option to maintain the original pitch of an audio clip at any speed.
You can change a clip’s speed using the Expert view timeline only. Not the Quick view timeline.
Note: When you change the speed of a clip containing interlaced fields, you may need to adjust how Premiere Elements
processes the fields, especially when the speed drops below 100% of the original speed.
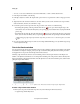
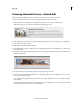
Change a clip’s speed by using Time Stretch
1 To slow down a clip that has another clip on its right in the Expert view timeline, drag it to an empty track or to the
end of the movie. This way, you can stretch it without bumping into an adjacent clip.
2 Select the clip in the Expert view timeline.
Note: If you haven’t yet inserted the clip into the Expert view timeline, you can select it in the Project Assets panel
instead.
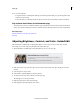
3 Choose Clip > Time Stretch. Alternatively, click the Tools panel on the Action bar and choose Time Stretch.
4 In the Time Stretch dialog box, type a percentage for Speed. A value less the 100% slows down the clip; a value greater
than 100% increases its speed.
5 (Optional) To keep the pitch of an audio clip unchanged, select Maintain Audio Pitch.
6 Click OK. Preview your changes, and then make adjustments as necessary.
7 If you moved the clip in step 1, drag it back into place in the movie.
Change the speed and duration of multiple clips
You can change the speed and duration of multiple clips when you are in the Expert view.
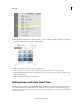
1 Do one of the following to select multiple clips:
• To select non-consecutive clips, Shift-click each clip.
• To select consecutive clips, click in the Project Assets panel and drag a marquee around the selected clips.
• To select all the clips, press Ctrl-A.
2 Select Clip > Time Stretch to modify the speed and duration of all the selected clips.
Time Remapping
Premiere Elements offers a guided edit for creating a slow or fast motion effect. Use this time remapping guided edit to
add dramatic effects to your video. For more information see,
.
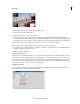
Set the duration of a clip
The duration of a video or audio clip is the length of time it plays from its first frame (In point) to its last frame (Out
point). The initial duration of a clip is the same as it was when the clip was imported or captured. Most often, you
change a clip’s duration by trimming frames from either end. But you can also trim the end of a clip by designating a
specific duration.
Unlike video, still images are not limited to the length of the original clip. You can set their duration to any length.
1 Select a clip in Project Assets panel or in the Expert view timeline.