
Operation Manual

93
USING PHOTOSHOP
Color fundamentals
Last updated 12/5/2011
Convert an image to Bitmap mode
Converting an image to Bitmap mode reduces the image to two colors, greatly simplifying the color information in the
image and reducing its file size.
When converting a color image to Bitmap mode, first convert it to Grayscale mode. This removes the hue and
saturation information from the pixels and leaves just the brightness values. However, because only a few editing
options are available for Bitmap mode images, it’s usually best to edit the image in Grayscale mode and then convert
it to Bitmap mode.
Note: Images in Bitmap mode are 1 bit per channel. You must convert a 16- or 32-bits-per-channel image to 8-bit
Grayscale mode before converting it to Bitmap mode.
1 Do one of the following:
• If the image is in color, choose Image > Mode > Grayscale. Then choose Image > Mode > Bitmap.
• If the image is grayscale, choose Image > Mode > Bitmap.
2 For Output, enter a value for the output resolution of the Bitmap mode image, and choose a unit of measurement.
By default, the current image resolution appears as both the input and the output resolutions.
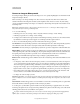
3 Choose one of the following bitmap conversion methods from the Use pop-up menu:
50% Threshold Converts pixels with gray values above the middle gray level (128) to white and pixels with gray values
below that level to black. The result is a very high-contrast, black-and-white representation of the image.
Pattern Dither Converts an image by organizing the gray levels into geometric configurations of black and white dots.
Diffusion Dither Converts an image by using an error-diffusion process, starting at the pixel in the upper-left corner
of the image. If the pixel’s value is above middle gray (128), the pixel is changed to white—if below it, to black. Because
the original pixel is rarely pure white or pure black, error is inevitably introduced. This error is transferred to
surrounding pixels and diffused throughout the image, resulting in a grainy, film-like texture.
Halftone Screen Simulates the appearance of halftone dots in the converted image. Enter values in the Halftone Screen
dialog box:
• For Frequency, enter a value for the screen frequency, and choose a unit of measurement. Values can range from
1.000 to 999.999 for lines per inch and from 0.400 to 400.00 for lines per centimeter. You can enter decimal values.
The screen frequency specifies the ruling of the halftone screen in lines per inch (lpi). The frequency depends on
the paper stock and type of press used for printing. Newspapers commonly use an 85-line screen. Magazines use
higher resolution screens, such as 133-lpi and 150-lpi. Check with your print shop for correct screen frequencies.
• Enter a value for the screen angle in degrees from -180 to +180. The screen angle refers to the orientation of the
screen. Continuous-tone and black-and-white halftone screens commonly use a 45° angle.
• For Shape, choose the dot shape you want.
Important: The halftone screen becomes part of the image. If you print the image on a halftone printer, the printer will
use its own halftone screen as well as the halftone screen that is part of the image. On some printers, the result is a moiré
pattern.
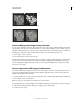
Custom Pattern Simulates the appearance of a custom halftone screen in the converted image. Choose a pattern that
lends itself to thickness variations, typically one with a variety of gray shades.
To use this option, you first define a pattern and then screen the grayscale image to apply the texture. To cover the
entire image, the pattern must be as large as the image. Otherwise, the pattern is tiled. Photoshop comes with several
self-tiling patterns that can be used as halftone screen patterns.
To prepare a black-and-white pattern for conversion, first convert the image to grayscale and then apply the Blur
More filter several times. This blurring technique creates thick lines tapering from dark gray to white.