
Operation Manual

83
USING PHOTOSHOP
Understanding and opening images
Last updated 12/5/2011
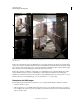
3 If you chose Exposure And Gamma, move the Exposure and Gamma sliders to adjust the brightness and contrast
of the image preview.
4 Click OK.
You can also adjust the preview of an HDR image open in Photoshop by clicking the triangle in the status bar of the
document window and choosing 32-Bit Exposure from the pop-up menu. Move the slider to set the white point for
viewing the HDR image. Double-click the slider to return to the default exposure setting. Since the adjustment is made
per view, you can have the same HDR image open in multiple windows, each with a different preview adjustment.
Preview adjustments made with this method are not stored in the HDR image file.
More Help topics
“Adjust HDR exposure” on page 135
About the HDR Color Picker
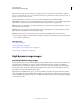
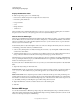
The HDR Color Picker allows you to accurately view and select colors for use in 32-bit HDR images. As in the regular
Adobe Color Picker, you select a color by clicking a color field and adjusting the color slider. The Intensity slider allows
you to adjust the brightness of a color to match the intensity of the colors in the HDR image you’re working with. A
Preview area lets you view swatches of a selected color to see how it will display at different exposures and intensities.
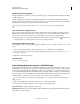
HDR Color Picker
A. Preview area B. Adjusted color C. Original color D. 32-bit floating point values E. Intensity slider F. Picked color G. Color slider H. Color
values
More Help topics
“Adobe Color Picker overview” on page 100
“Adjust displayed dynamic range for 32-bit HDR images” on page 82
E
D
F
G
B
C
H
A