
Operation Manual

82
USING PHOTOSHOP
Understanding and opening images
Last updated 12/5/2011
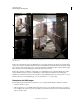
Compensate for moving objects
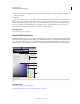
If images have different content due to moving objects like cars, people, or foliage, select Remove Ghosts in the Merge
To HDR Pro dialog box.
Photoshop displays a green outline around the thumbnail with the best tonal balance, identifying the base image.
Moving objects found in other images are removed. (If movement occurs in very light or dark areas, click a different
thumbnail where moving objects are better exposed to improve results.)
For a tutorial on the Remove Ghosts option, see this video. (Discussion of Remove Ghosts begins at 3:00.)
Save or load camera response curves
Response curves indicate how camera sensors interpret different levels of incoming light. By default, the Merge To
HDR Pro dialog box automatically calculates a camera response curve based on the tonal range of images you are
merging. You can save the current response curve and later apply it to another group of merged images.
❖ In the upper-right corner of the Merge to HDR Pro dialog box, click the response curve menu , and then choose
Save Response Curve. (To later reapply the curve, choose Load Response Curve.)
Convert from 32 bits to 16 or 8 bpc
If you originally created a 32-bit image during the Merge to HDR Pro process, you can later convert it to a 16- or 8-bit
image.
1 Open a 32-bpc image in Photoshop, and choose Image > Mode > 16 Bits/Channel or 8 Bits/Channel.
2 Adjust exposure and contrast to produce an image with the dynamic range you want. (See “Options for 16- or 8-
bit images” on page 81.)
3 Click OK to convert the 32-bit image.
More Help topics
“Curves overview” on page 124
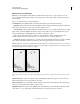
Adjust displayed dynamic range for 32-bit HDR images
The dynamic range of HDR images exceeds the display capabilities of standard computer monitors. When you open
an HDR image in Photoshop, it can look very dark or washed out. Photoshop lets you adjust the preview so that the
monitor displays an HDR image whose highlights and shadows aren’t washed out or too dark. The preview settings
are stored in the HDR image file (PSD, PSB, and TIFF only) and are applied whenever the file is opened in Photoshop.
Preview adjustments don’t edit the HDR image file; all the HDR image information remains intact. Use the Exposure
adjustment (Image
> Adjustments > Exposure) to make exposure edits to the 32-bpc HDR image.
To view 32-bit readouts in the Info panel, click the Eyedropper icon in the Info panel and choose 32-Bit from the
pop-up menu.
1 Open a 32-bpc HDR image in Photoshop, and choose View > 32-Bit Preview Options.
2 In the 32-bit Preview Options dialog box, choose an option from the Method menu:
Exposure And Gamma Adjusts the brightness and contrast.
Highlight Compression Compresses the highlight values in the HDR image so they fall within the luminance values
range of the 8- or 16-bpc image file.