
Operation Manual

605
USING PHOTOSHOP
Optional plug-ins
Last updated 12/5/2011
9 Navigate through the generated tiles in the Tile History panel to select the tile that you want to use to fill the layer
or to save as a pattern preset.
• To move through the tiles you’ve generated, click the First Tile button, Previous Tile button, Next Tile button, or
Last Tile button. Or, type the number of the pattern preview you want to view, and press Enter (Windows) or
Return (Mac
OS).
• To view how the tile looks as a repeating pattern in the preview area, make sure that Update Pattern Preview is
selected. If tile previewing is slow, deselect this option, find the tile you want, and then select the option.
• To delete a tile and pattern preview, navigate to the tile you want to delete, and click the Delete icon.
• To save a tile as a preset pattern, navigate to the tile you want to save, and click the Save Preset Pattern button. Enter
a preset name, and click
OK. When you save a tile as a preset pattern, only a single tile is saved, not the full,
generated pattern.
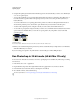
Tile History buttons
A. Save Preset Pattern B. First Tile C. Previous Tile D. Next Tile E. Last Tile F. Delete icon
10 When you are satisfied with a pattern preview and you have saved the tiles that you might want to use in the future,
click
OK to fill the layer or selection.
If you are creating preset patterns only, click Cancel to close the dialog box without filling the layer.
Run Photoshop in 32-bit mode (64-bit Mac OS only)
In 64-bit versions of Mac OS 10.5 and later, some older, optional plug-ins are available only if Photoshop is running
in 32-bit mode:
1 In the Finder, choose Go > Applications.
2 Expand the Photoshop folder. Then right-click the Photoshop application icon, and choose Get Info.
3 In the General section of the Info window, select Open In 32-bit Mode.
4 Close the Info window, and restart Photoshop.
For more information, see 64-bit operating system benefits and limitations in Photoshop.
ABC DE F