
Operation Manual

551
USING PHOTOSHOP
3D
Last updated 12/5/2011
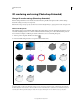
• Lighting from object reflectance (color bleed).
• Reduced noise in soft shadows.
Note: A final render can be time-consuming, depending on the model, lighting, and maps in your 3D scene.
1 Make any necessary adjustments to your model, including lighting and shadow effects.
You don’t need to change Anti-Alias settings for the scene before rendering. By default, theBest setting is used.
2 At the top of the 3D panel, click the Scene button , and then click the Scene entry in the list below.
3 From the Quality menu in the lower half of the panel, select Ray Traced Final.
After the render is complete, you can flatten the 3D scene for output in anther format, composite the 3D scene with
2D content, or print directly from the 3D layer.
For exported video animations, Render For Final Output is available as an option in the 3D Render Settings dialog
box. See “Customize render settings” on page 549.
Saving and exporting 3D files (Photoshop Extended)
To preserve the 3D content in a file, save the file in Photoshop format or another supported image format. You can
also export a 3D layer as a file in a supported 3D file format.
Export a 3D layer
You can export 3D layers in all supported 3D formats: Collada DAE, Wavefront/OBJ, U3D, and Google Earth 4 KMZ.
When choosing an export format, consider the following factors:
• Texture layers are saved in all 3D file formats; however, U3D preserves only Diffuse, Environment, and Opacity
texture maps.
• Wavefront/OBJ format does not save camera settings, lights, or animation.
• Only Collada DAE saves render settings.
To export a 3D layer, do the following:
1 Choose 3D > Export 3D layer
2 Choose a format for exporting textures:
• U3D and KMZ support JPEG or PNG as texture formats.
• DAE and OBJ support all Photoshop-supported image formats for textures.
3 (Optional) If exporting to U3D format, choose an encoding option. ECMA 1 is compatible with Acrobat 7.0; ECMA
3 is compatible with Acrobat 8.0 and later and provides some mesh compression.
4 Click OK to export.
Save a 3D file
To preserve 3D model position, lighting, render mode, and cross sections, save files with 3D layers in PSD, PSB, TIFF,
or PDF format.
❖ Choose File > Save or File >
❖ Save As
❖ , select Photoshop (PSD), Photoshop PDF, or TIFF format, and click OK.