
Operation Manual

546
USING PHOTOSHOP
3D
Last updated 12/5/2011
• 3D render settings. Change render modes, with the ability to tween transitions between some render modes. For
example, change Vertices mode gradually to Wireframe over time, to simulate the sketching-in of a model’s
structure.
• 3D cross section. Rotate an intersecting plane to display a changing cross section over time. Change cross section
settings between frames to highlight different model areas during an animation.
For high quality animations, you can render each animation frame using the Render for Final Output render setting.
See
“Change 3D render settings (Photoshop Extended)” on page 548.
More Help topics
“Creating timeline animations (Photoshop Extended)” on page 503
Combining and converting 3D objects (Photoshop
Extended)
Combine 3D objects (Photoshop Extended)
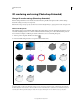
Merging 3D layers allows you to combine multiple 3D models in one scene. Once combined, each 3D model can be
manipulated separately, or you can use position and camera tools on all models simultaneously.
1 Open two document windows, each containing a 3D layer.
2 Make the source document (the file from which you are copying the 3D layer) active.
3 Select the 3D layer in the Layers panel and drag it into the window of the target document (the file which will
contain the combined 3D objects).
The 3D layer is added as a new 3D layer in the target document. It becomes the active layer in the Layers panel of
the target document.
4 In the Tools panel, select a 3D camera tool.
5 In the options bar, from the Position menu, select the layer name for the original 3D layer in the target file.
After you match the camera position of the two 3D layers, the two 3D objects appear together in the scene. Use the
3D object tools to reposition the objects before merging.
6 From the Layers panel options menu , choose Merge Down.
The two 3D layers are combined into one 3D layer. The point of origin of each model is aligned.
Note: Depending on the size of each 3D model, one model may appear partially or completely embedded in the other
model after merging 3D layers.
After merging two 3D models, all meshes and materials from each 3D file are contained in the target file and appear
in the 3D panel. In the Meshes panel, you can select and reposition individual meshes using the 3D position tools in
the panel. See
“3D Mesh settings (Photoshop Extended)” on page 528.
To alternate between moving all models at once and moving individual models in the layer, switch between the 3D
position tools in the Tools panel and the tools in the Meshes panel.