
Operation Manual

545
USING PHOTOSHOP
3D
Last updated 12/5/2011
Note: You can add your own custom shapes to the shape menu. Shapes are Collada (.dae) 3D model files. To add a
shape, place the Collada model file in the Presets\Meshes folder inside the Photoshop program folder.
• The 2D layer is converted to a 3D layer in the Layers panel.
• The original 2D layer appears in the Layers panel as a Diffuse texture map. It may be used on one or more
surfaces of the new 3D object. Other surfaces may be assigned a default diffuse texture map with a default color
setting. See
“3D panel overview (Photoshop Extended)” on page 525.
3 (Optional) Use the Spherical Panorama option if you are using a panoramic image as your 2D input. This option
converts a complete 360 x 180 degree spherical panorama to a 3D layer. Once converted to a 3D object, you can
paint areas of the panorama that are typically difficult to reach, such as the poles or areas containing straight lines.
For information on creating a 2D panorama by stitching images together, see
“Create 360-degree panoramas
(Photoshop Extended)” on page 210.
4 Export the 3D layer in a 3D file format or save in PSD format to retain the new 3D content. See “Export a 3D layer”
on page 551.
Create a 3D mesh
The New Mesh from Grayscale command converts a grayscale image into a depth map, which translates lightness
values into a surface of varying depth. Lighter values create raised areas in the surface, darker values create lower areas.
Photoshop then applies the depth map to one of four possible geometries to create a 3D model.
1 Open a 2D image and select one or more layers that you want to convert to a 3D mesh.
2 (Optional) Convert the image to grayscale mode. (Choose Image > Mode > Grayscale, or use Image > Adjustments
> Black & White to fine-tune the grayscale conversion.
Note: If you use an RGB image as input when creating a mesh, the green channel is used to generate the depth map.
3 (Optional) Make adjustments to the grayscale image if necessary to limit the range of lightness values.
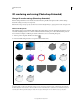
4 Choose 3D > New Mesh From Grayscale, and then select a mesh option.
Plane Applies depth map data to a planar surface.
Two-Sided Plane Creates two planes reflected along a central axis and applies depth map data to both planes.
Cylinder Applies depth map data outward from the center of a vertical axis.
Sphere Applies depth map data radially outward from a center point.
Photoshop creates a 3D layer containing the new mesh. It also creates Diffuse, Opacity, and Planar Depth Map texture
maps for the 3D object, using the original grayscale or color layer.
You can reopen the Planar Depth Map as a Smart Object at any time and edit it. When you save it, the mesh is
regenerated.
Note: The Opacity texture map does not appear in the Layers panel, because that map uses the same texture file as the
Diffuse map (the original 2D layer). When two texture maps reference the same file, the file appears only once in the
Layers panel.
Create 3D animations (Photoshop Extended)
Using the Photoshop Animation timeline, you can create 3D animations that move a 3D model through space and
change the way it displays over time. You can animate any of the following properties of a 3D layer:
• 3D object or camera position. Use the 3D position or camera tools to move the model or 3D camera over time.
Photoshop can tween frames between position or camera movements to create smooth motion effects.